
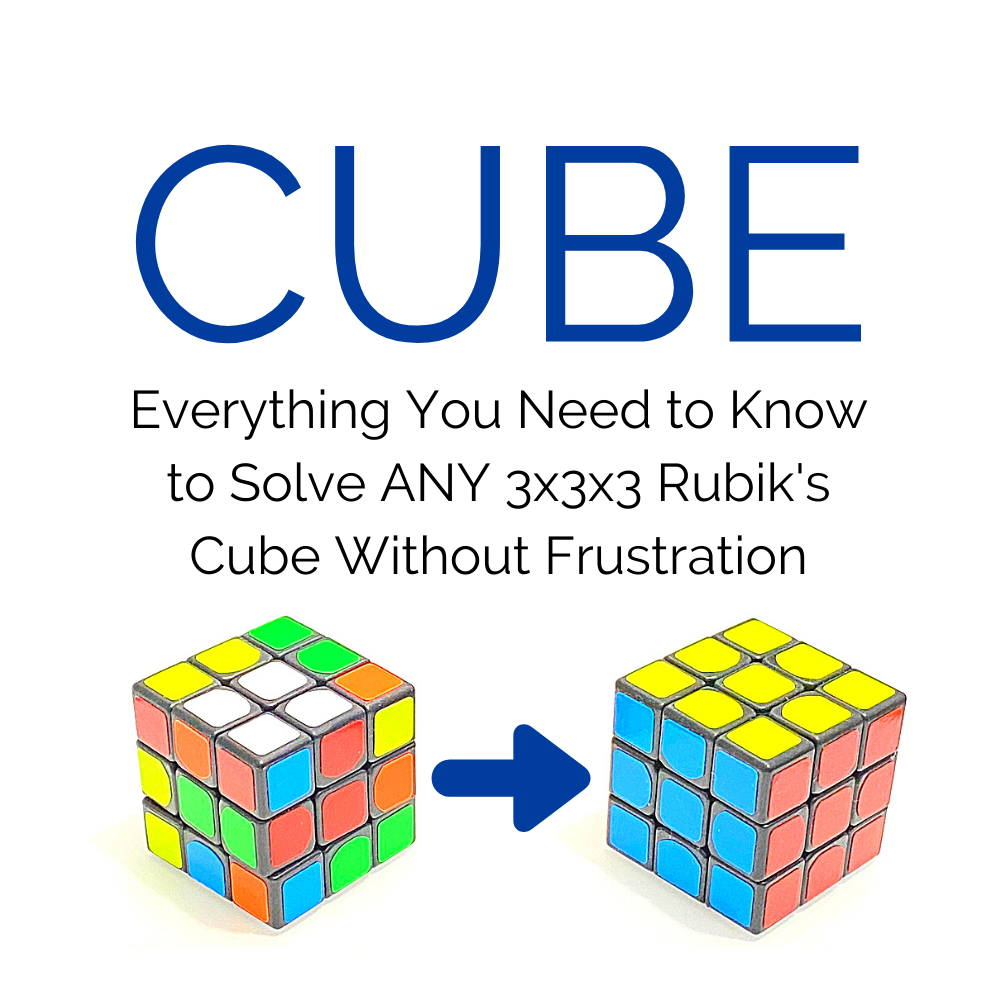
CUBE: Everything You Need to Know to Solve ANY 3x3x3 Rubik’s Cube Without Frustration by Ben Balden
Skip to Instructions | Skip to the Charts
Download My Rubik’s Cube Worksheet


Download Rubik’s Cube Worksheet
Download The Simplified Overview Sheet
Download my “How to Solve a Rubik’s Cube” sheet for FREE when you subscribe to my emails.
- Everything you need to solve any cube
- Solutions all on one page
- Instructions in pictograph form
- Systematically organized
- 7 Easy steps
- Video Instruction examples
Get My Rubik’s Cube Book
![]()
What to expect to find in this book…
- Hours of fun
- A bit of history of the cube
- Interesting mathematical facts
- Everything you need to solve any cube
- Solutions all on one page
- Instructions in pictograph form
- Systematically organized
- 7 Easy steps
- Video Instruction examples
This is everything you need to know to solve any Rubik’s cube.
Hi, this is Ben Balden from benbalden.com encouraging you to life a happier, fuller life through personal development. That’s what I usually talk about: personal development, or being the best version of you by mastering true principles. But, today I have something a little different.
Have you ever tried to solve a Rubik’s cube?
The Rubik’s cube is like personal development. It is nearly impossible to solve without a strategy or some formulas. But, with a few strategies or a bit of knowledge you can solve it in minutes or seconds rather than weeks.
Today I’m going to teach you everything you need to know to solve it by yourself. And I’ve got some free stuff to give you, too.
…
Why The Rubik’s Cube
So, I know what you’re thinking: ”Why the Rubik’s Cube?”. It’s not my normal topic. Well, I was bored.
We all need entertainment. And I was searching for some entertainment that didn’t have anything to do with electronics. I felt I just had too much electronics in my life and wanted to balance things up a bit. I was sure there were a lot of non-electronic things to entertain me.
Before electronics, people read books, made music, played games and sports, and solved puzzles and riddles. So, I decided I wanted to learn a new skill and solve one of the world’s hardest puzzle games: the Rubik’s Cube. I had seen videos of kids solving these in seconds. It looked amazing.
So I learned it. It was entertaining. And now, I’m going to teach you. I’m going to give you some background on the Rubik’s Cube and attempt to demystify it. Then, I’ll share with you the method I use for solving it and why.
If you want to skip to the instructions, just follow the links to the point that interests you. I also have some videos practicing how to solve scrambled cubes you can watch to help learn the technique. And if you continue until the end, I’ll tell you where you can get FREE printable instructions to help make learning the cube easier.
Rubik’s Cube Origins
Let me first share with you some interesting, and entertaining facts about the Rubik’s Cube.
The Rubik’s Cube is a six-sided sliding puzzle that most people feel is almost impossible to solve. It’s three blocks wide, high, and deep. You solve it by rotating the sides one at a time.
The Rubik’s Cube was accidentally invented in 1974 by Hungarial sculptor and professor of architecture Ernő Rubik. His actual purpose in inventing the cube was solving the structural problem of moving the parts independently without the entire mechanism falling apart. He didn’t realize he created a puzzle until he scrambled it.1

It eventually became a game. The Rubik’s cube is now the world’s top-selling puzzle game. As of 2009, 350 million sold.2 That’s like one cube for everyone in America.
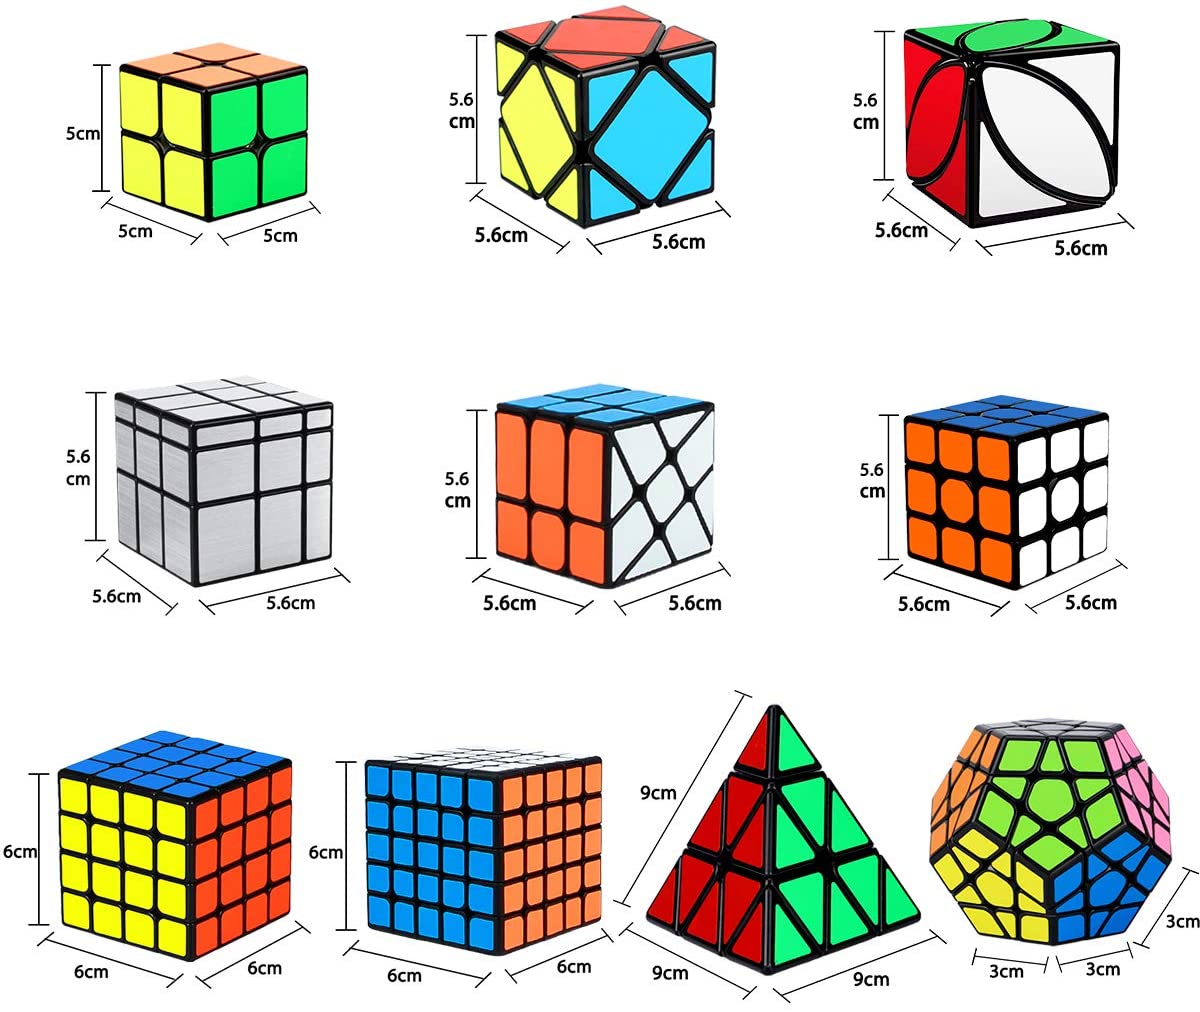
Now, Rubik’s cubes come in a myriad of different shapes and sizes. The most popular shapes for these Rubik’s cubes variations are:
- 2x2x2 (Pocket or Mini Cube)
- 4x4x4 (Rubik’s Revenge)
- 5x5x5 (Professor’s Cube)
- 17x17x17 (Over The Top)
- Tetrahedron (Pyraminx) – Triangular pyramid
- Octahedron (Skewb Diamond) – 8-sided shape
- Dodecahedron (Megaminx) – 12 faces
- Icosahedron (Dogic) – 20 faces
- Square One – cube with odd shape pieces
Buy these cubes here: https://amzn.to/3lJACgw
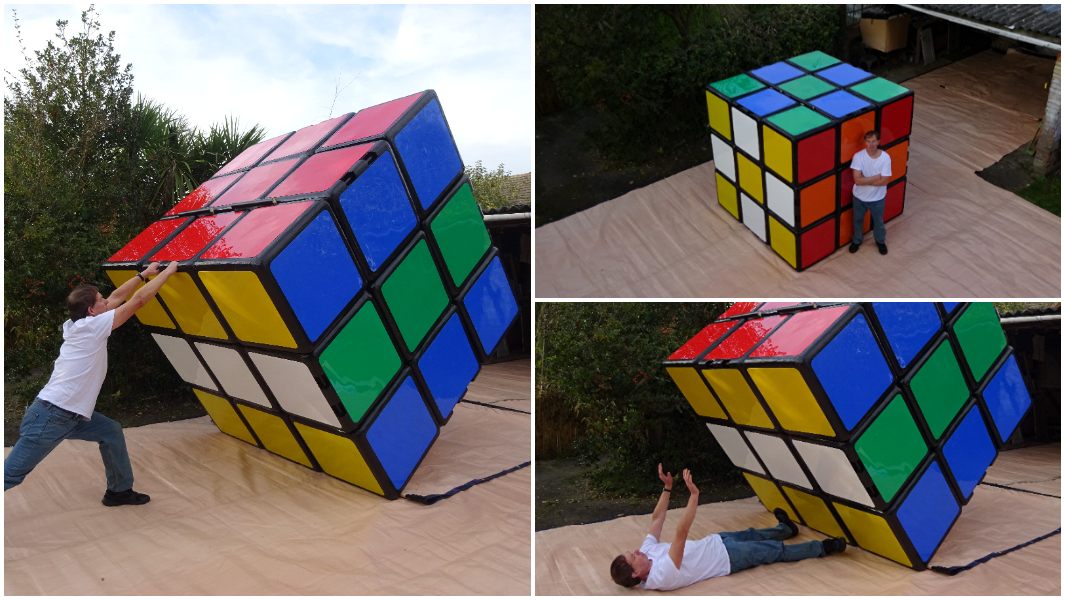
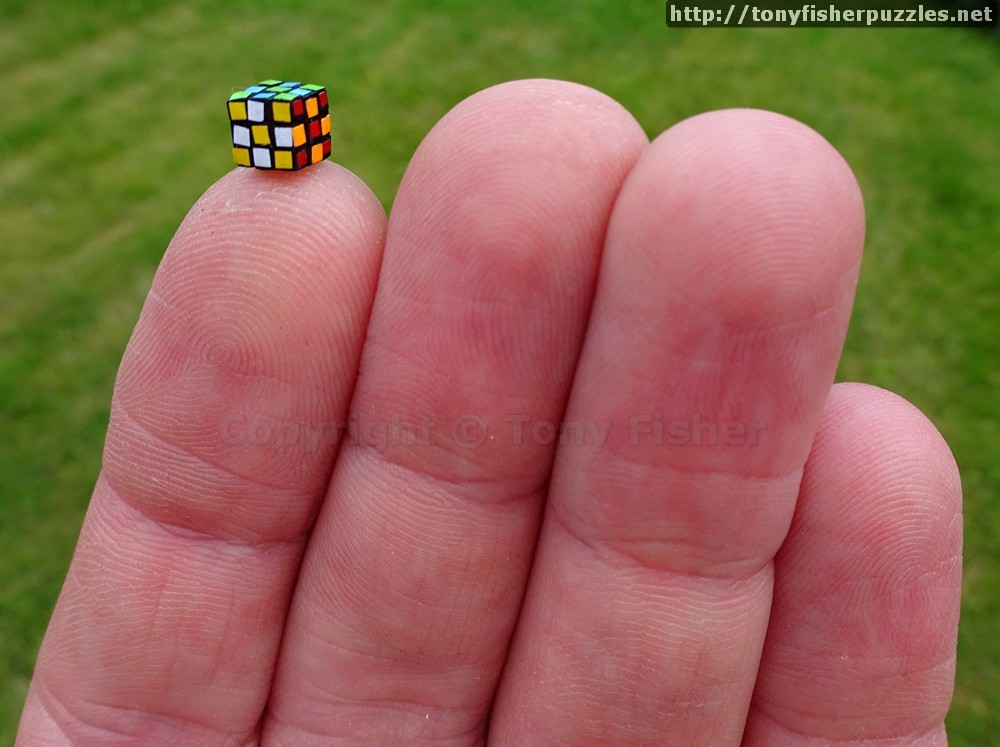
There have been many forms of the original Rubik’s Cube including the world’s biggest (2.022 m (6 ft 7 in))3 and smallest (5.6mm)4 cubes both invented by Tony Fisher6
World’s Largest Cube
World’s Smallest Cube

World’s Most Expensive Cube

Amazing People Solving The Cube
I saw a story once where after he invented the Rubik’s Cube, Ernő Rubik himself first took a month to solve it once it was scrambled.7
The truth is that out of the 350 million cubes sold worldwide, most people can only solve for one or two faces or even a complete side. The cube is difficult to solve. In the early years of the Rubik’s Cube, most people had to buy a book to solve it.8
But while it takes no skill to scramble it, it doesn’t necessarily take a genius to solve it. All it takes is a small amount of knowledge and a bit of skill. You can learn to solve it in minutes. However, you’ll need a strategy.
If you have tried yourself, you may have already discovered that solving the cube is almost impossible to solve without knowing or inventing some strategy, technique, or using a memorized set of moves. So, rest assured if you see someone solving a Rubik’s Cube, they are most likely using some of these formulas. You can spend weeks to discover your own secret code or formula to manipulate the blocks around or you can learn from someone else.
By the end of this tutorial, you’ll know everything you need to know to solve it yourself, so you can amaze your family and friends and feel the confidence of learning a super smart skill and being able to do something few people can do. It’s pretty awesome. If you stay with me to the end, I’ll show you where you can download my exclusive free cheat sheet of secret codes to crack the cube and track your progress as you learn. I’ll also show you tutorial videos where you can watch the cube get solved one step at a time.
Here’s what some of these cube-solving geniuses don’t want you to know: The truth is … Most people can learn a few memorized steps and solve the cube in a couple minutes.
The fastest Rubik’s Cube ever solved during a competition was in 2018 by Yusheng Du solved the cube in 3.47 seconds.9

However, most speedcubers (that is people who compete in solve times) are actually more interested in average solve times because, let’s face it, you can always get a lucky cube. The record for average solve times is held by Feliks Zemdegs 5.69 seconds. This guy actually holds, or has held, many of the world records in the cubbing world.


These world record solve times appear to be falling all the time. We might reach a point that is beyond human ability, but who knows. Recent breakthroughs in solve times have come with better equipment like speedcubes or magnetic cubes.
Source of chart: Yusheng Du 3.47 WR, Controversy, Solve Reconstruction video by J Perm https://youtu.be/F4keoLytAsM


In fact, some really talented people out there have been able to solve the cube …
- One-handed
- Blindfolded
- While juggling
- With feet only


And people keep getting better at it, too!
Source: Engaging Data: https://engaging-data.com/rubiks-cube-world-records/

Even a 3 year old can solve the cube.10
There are many records, competitions, and awards for many of these. There are even group solving competitions.
With a bit of help, you can solve it, too. It might take you over 30 min to solve your first cube, but with practice those solve times will come down quickly. After fiddling with my first cube for a week without any serious practice, I got my record down to about 2 minutes. Now it’s much much less. I may never master the 200 or so formulas or algorithms I need to know to solve it in seconds because there are many other things that are more important to me right now. But if that’s your goal, what you’ll learn here will give you a good boost in the right direction.
Generally speaking, the more techniques you learn with practice, the faster solve times you will have (if that’s your goal). It does certainly impress some people.
Generally more techniques + more practice = faster solve times
My tip is to start with a technique or two that you can grow with, and as you improve add more.
Demystifying The Cube
Demystifying the cube will make it seem easier to solve. Looking at some quick facts about the Rubik’s Cube that will help demystify the cube and make it seem more possible to you. The idea is the more you understand it, the easier it becomes.
Quintillions Of Possibilities
Let’s first look at the possibilities. There are billions of billions of ways to scramble it (more than grains of sand on all Earth’s beaches). Originally thought to be 3 billion there are actually approximately 43 quintillion different starting points or scrambles of the cube (permutations). That’s insane. Here’s the math.
8!*37*(12!/2)*211 = 43,252,003,274,489,856,000
The factorial of 8 (8!=8*7*6*5*4*3*2*1)11 accounts for each corner in the right place multiplied by 37 (or 3*3*3*3*3*3*3) for the correct orientation of those corners. Multiply that by the edges in the right place 12!, but we have to halve that because only half of those edge permutations will work and multiply that by 211 to find the correct orientations of those edges and you get this insanely large number: 43 quintillion.
To put this astronomical number into perspective, if one had one standard-sized Rubik’s Cube for each permutation, one could cover the Earth’s surface 275 times, or stack them in a tower 261 light-years high.12
That’s only if you began the scramble with a solved cube. If you take all the pieces apart, there are 12 times as many possibilities, which is approximately 519 quintillion. Here’s the math without the limitations of the puzzle mechanics.
8!*38*12!*212 = 519,024,039,293,878,272,000
So, mathematically speaking, if you disassemble and reassemble your cube randomly, there is only 1/12 chances it is solvable by rotating the sides. So don’t take it apart.
Assuming you have a non-disassembled scrambled cube in one of those 43 quintillion permutations, there are many ways to solve that cube.
Many Methods To Solve The Cube
With most methods, you solve one layer at a time, others might solve all the corners first then the edges.
Some methods require more moves than other methods. With most methods, however, it takes under 100 moves to solve the cube (speedcubers can sometimes perform 16 moves a second). Some methods take fewer than 50 moves. The fewest number of moves it takes to solve a Rubik’s Cube is called optimum solution. Using a computer (or an app on your phone) you can see the absolute minimum number of moves it would take to solve a cube for a specific scramble.
Now, people have been pondering for a long time what would be the maximum amount of moves it would take to optimally solve ANY scramble. That is, you could solve ANY cube under that number of moves. That magic number was referred to in the Rubik’s Cube world as, “God’s Number,” and it went unknown for years. In 2010, a guy named Tomas Rokicki working with Google and others proved “God’s Number” to be 20. That means there are no starting positions, no matter the scramble, that would take more than 20 moves to optimally solve it. In fact, they discovered the mathematical formula to prove this. Where a n×n×n cube can be optimally solved in Θ(n2 / log(n)) moves or less. I’ll be honest with you, I don’t really know what this equation means, but I think it’s so cool that it all boiled down to a simple three-part equation with only a few variables.
Θ(n2 / log(n)) = optimum number of moves
So, you just need to figure out what those moves are and you can solve the cube in less than 20 moves. For a speedcuber doing 16 moves a second, that means only a few seconds. But the trick is, it’s impossible to discover what those moves are just by looking at the cube.
In fact, in the Rubik’s Cube world, there are competitions where they give participants a scrambled cube and an hour to figure out what the minimum number of moves that can solve that cube. It’s called “Fewest Moves Solving” and the record is 16 moves with the average of three scrambles being 22 moves – both held by the same guy, Sebastiano Tronto of Italy 15 June 2019.
Computers, of course, have the advantage in calculating the minimum number of moves and are able to calculate the solution to the cube at lightning speeds. The fastest computer to physically solve the Rubik’s Cube in less than 1 second, .38 seconds actually, was MIT’s robot built by Ben Katz and Jared Di Carlo in 201613
But thanks to some very clever inventions, you can benefit from this computing power, too. Of course you can discover these less than 20 moves (or about that) with some smartphone apps out there. You can even build your own LEGO bot out of LEGOs to solve it for you. Or, better yet, you can just buy a cube-solving robot on Amazon.com for about $69 and get it to solve (or scramble) your cubes in 6 seconds. Lacking any of those things, you can just access any of the online websites that give you a solution when you input your cube scramble.
Here are the links for these things
- Smartphone apps – here are a few iPhone apps I’ve tried and liked.
- Rubik’s Cube Official App (https://apps.apple.com/us/app/rubiks-official-cube/id1504482335) – This is the official app of the Rubik’s Cube brand. There are three different things you can do with this app: (1) Augmented Reality using the camera to help you solve your cube. (2) Virtual Cube, which lets you solve a virtual cube on the screen. And (3) a timer, which give you a scramble and then times you to solve it.
- Cube AR (https://apps.apple.com/us/app/cube-ar/id1269336347) – The app scans your cube and helps you solve it.
- Cube Solver (https://apps.apple.com/us/app/magic-cube-solver/id784085951) – You can put in your colors in a graph and it will give you solve instructions. That’s it.
- A Solver (https://apps.apple.com/us/app/asolver-lets-solve-the-puzzle/id1505663005) – This app also photographs your cube (or you can input them) and it will give you instructions to solve it.
- Watch Cube (https://apps.apple.com/us/app/watch-cube/id1469772445) – Solve a cube on your Apple Watch. It’s a mini cube you can practice with anywhere.


- Video of Lego Robotic Solve (https://youtu.be/dreTvumjNyw) – There are a lot of LEGO cube solver devices people have built. This one looks like one anyone can build with the right LEGO Mindstorm kit.
- Cube-solving robot on Amazon (https://amzn.to/35ETYhr) – This is an amazing portable robot you can buy that will scan and solve your cube for you.
- Cube Solver: https://rubiks-cube-solver.com/
- Cube Scrambler: https://www.jaapsch.net/scramble_cube.htm
But, you can solve it on your own with just a little information.
I’m going to show you everything you need to know to solve ANY 3x cube in the world, no matter how scrambled it is. These cubing methods may require a few more moves, like 100 moves, but they are easy to learn and can be used with any cube. After some practice, you can solve it by yourself in a minute at any time without looking at any notes or cheating in any way. You’ll join the select few people in the world with this awesome skill.
Are you ready?
Now, let’s demystify the Rubik’s cube and teach you the keys to unlock it.
An Overview of The Cube
Let’s break it down. The Rubik’s Cube has 6 faces like any cube in the universe. A standard cube is 3 blocks deep, wide, and high (3x3x3). There are actually only 26 blocks rather than the 27 blocks you would expect from multiplying out 33 because there is no block in the center. So, adjusting for the realities of the cube, we need to adjust for all the blocks not visible in the puzzle (33-1=26). Looking at the cube in layers, there are 9 blocks on the bottom, 8 blocks in the middle, and 9 blocks on top.
-
- 9 bottom
- 8 middle
- 9 top
- 9+8+9 = 26 blocks
Out of these 26 blocks, there are only 3 kinds of blocks: centers, corners, and edges. Let’s talk about each piece. Looking at the cube in terms of types of blocks, there are 6 center blocks, 8 corner blocks, and 12 edge blocks.
-
- 6 center
- 8 corners
- 12 edges
- 6+8+12 = 26 blocks
6 x CENTER BLOCKS
So, there are 6 center blocks, one for each side. These center blocks are one-sided and fixed in place. Because these 6 blocks are fixed, they are by definition ALWAYS solved. So, that means out of 26 blocks, you only need to solve 20 (8 corners and 12 edges). Before even starting, no matter what you do, no matter how you scramble it, you already have 6 blocks solved. Something to be happy about. You only need to solve 20 blocks.
In a standard Rubik’s Cube, the colors are fixed, too: White, Blue, Red, Green, Orange, and Yellow. Most cubes always have the same colors in the following combination with red, white, and blue always in clockwise order.
- Blue is always opposite Green
- Red is always opposite Orange
- White is always opposite Yellow
8 x CORNER BLOCKS
There are 8 corner blocks to solve. They are all unique. Each has three sides and each of the 6 colors has 4 blocks:
- White – Blue – Red
- White – Blue – Orange
- White – Red – Green
- White – Green – Orange
- Yellow – Blue – Red
- Yellow – Blue – Orange
- Yellow – Red – Green
- Yellow – Green – Orange
All these unique blocks must be in the exact place and orientation relative to the center blocks to solve the cube correctly. If you have the faces solved, but not the corresponding edges and corners, those blocks are NOT solved.
12 x EDGE BLOCKS
There are 12 edge blocks to solve. They are all unique. Each has two sides, and there are 4 edge blocks for each color:
12 possibilities:
- 4 white edges on bottom
- White – Blue
- White – Red
- White – Green
- White – Orange
- 4 colored middle edges
- Blue – Red
- Blue – Orange
- Red – Green
- Green – Orange
- 4 yellow top edges
- Yellow – Blue
- Yellow – Red
- Yellow – Green
- Yellow – Orange
Impossible Blocks That Don’t Exist
There are some block combinations that you will never see because, given the realities of the Rubik’s Cube, they can never exist. Some impossibilities may include:
- SAME – Blocks with more than one side with the same color
- OPPOSITE – Blocks that are impossible because they contain sides with colors on the opposite side of the cube
- ORDER – All the blocks that have the same colors, but just ordered differently in the permutation
Examples:
- Any CORNERS with multiple same or opposite colors (there are 168 of these types of these impossible corner blocks). Here are some examples:
- White – White – Red
- Green – Orange – Green
- White – Yellow – Blue
- Blue – Green – Red
- Red – Orange – Yellow
- Any EDGES with multiple or opposite colors (there are 12 of these types of these impossible edge blocks). Here are some examples:
- Blue – Blue
- White – Yellow
- Blue – Green
- Red – Orange
When you throw the order of the colors into the mix (orientation), there are even more blocks that can’t exist. For instance, there is a White – Blue – Red corner block in clockwise order. But there exists no White – Red – Blue corner block in clockwise order.
Just to nerd out a bit, if you calculate the total permutations of 6 colors for blocks with 1, 2, and 3 sides, then subtract out blocks which are impossible given the realities of the cube, you come up with the same numbers of types of blocks: 6 center blocks, 8 corner blocks, and 12 edge blocks. See the table below.
| # of sides | Total permutations = colorssides | 1. More than one of the same color on the same block | 2. Impossible blocks because they contain opposite colors | Eliminate blocks with ANY of these 3 elements | 3. Same block colors but in a different order | Total possible blocks given the realities of the cube | |
| Center | 1 | 61 = 6 | 0 | 0 | 0 | 0 | 6 |
| Edges | 2 | 62 = 36 | 6 | 6 | 24 | 15 | 12 |
| Corners | 3 | 63 = 216 | 96 | 90 | 208 | 160 | 8 |
| Total Blocks | 258 | 102 | 96 | 232 | 175 | 26 |
Moreover some of these impossibilities exist 2 or 3 times on the same block. So, the number of blocks with ANY of these impossible elements to be eliminated is less than the total number of blocks in each of the types of impossible elements. Which means that there are 232 impossible blocks that you’ll never find on your cube because of the realities and limitations of the way the cube is set up.
The Goal
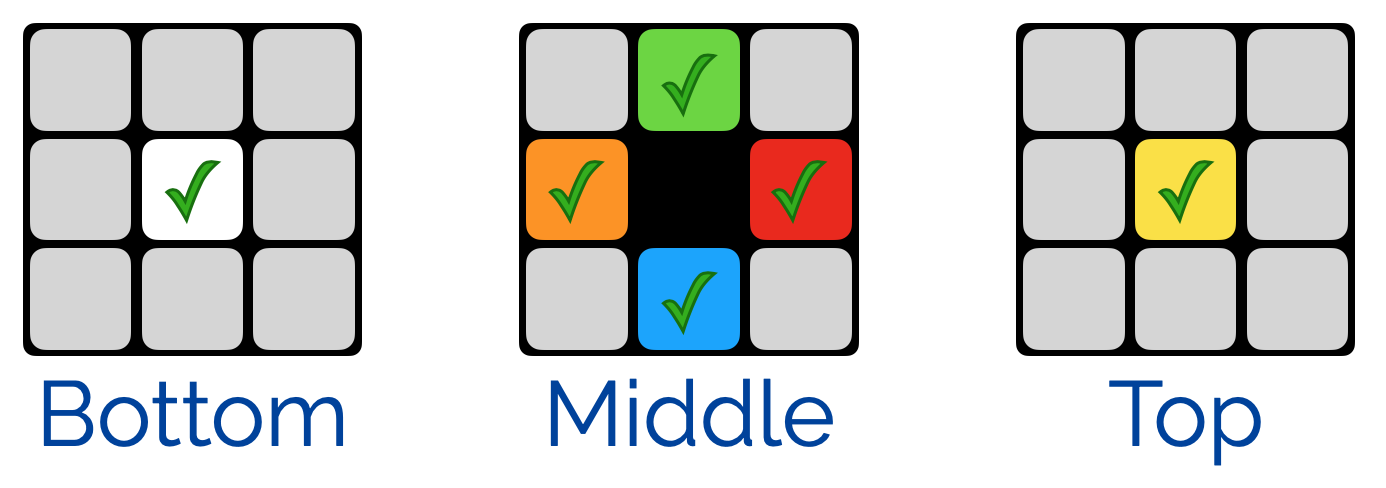
Your mission should you accept it is to get all 20 pieces in the correct place relative to the 6 center blocks solved by definition thereby making each side of the cube a solid color. We’re going to use a strategy to solve the cube in 5 sets of 4 blocks from bottom up.
- Bottom
- 4 edges
- 4 corners
- Middle
- 4 edges
- Top
- 4 corners
- 4 edges
TOTAL = 4+4+4+4+4 = 4*5 = 20 blocks
You do this by manipulating the blocks into place one at a time. Once the block is in place, none of the subsequent moves will remove the block. Each step adds one solve to another until the cube is done.
Rubik’s Cube Terminology
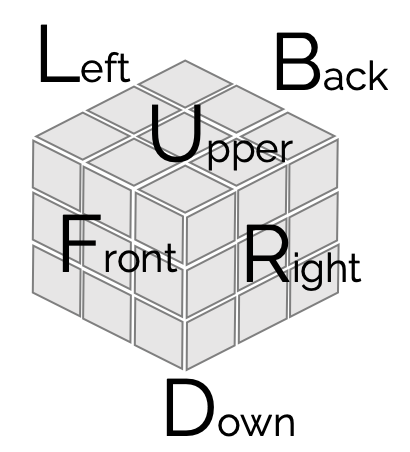
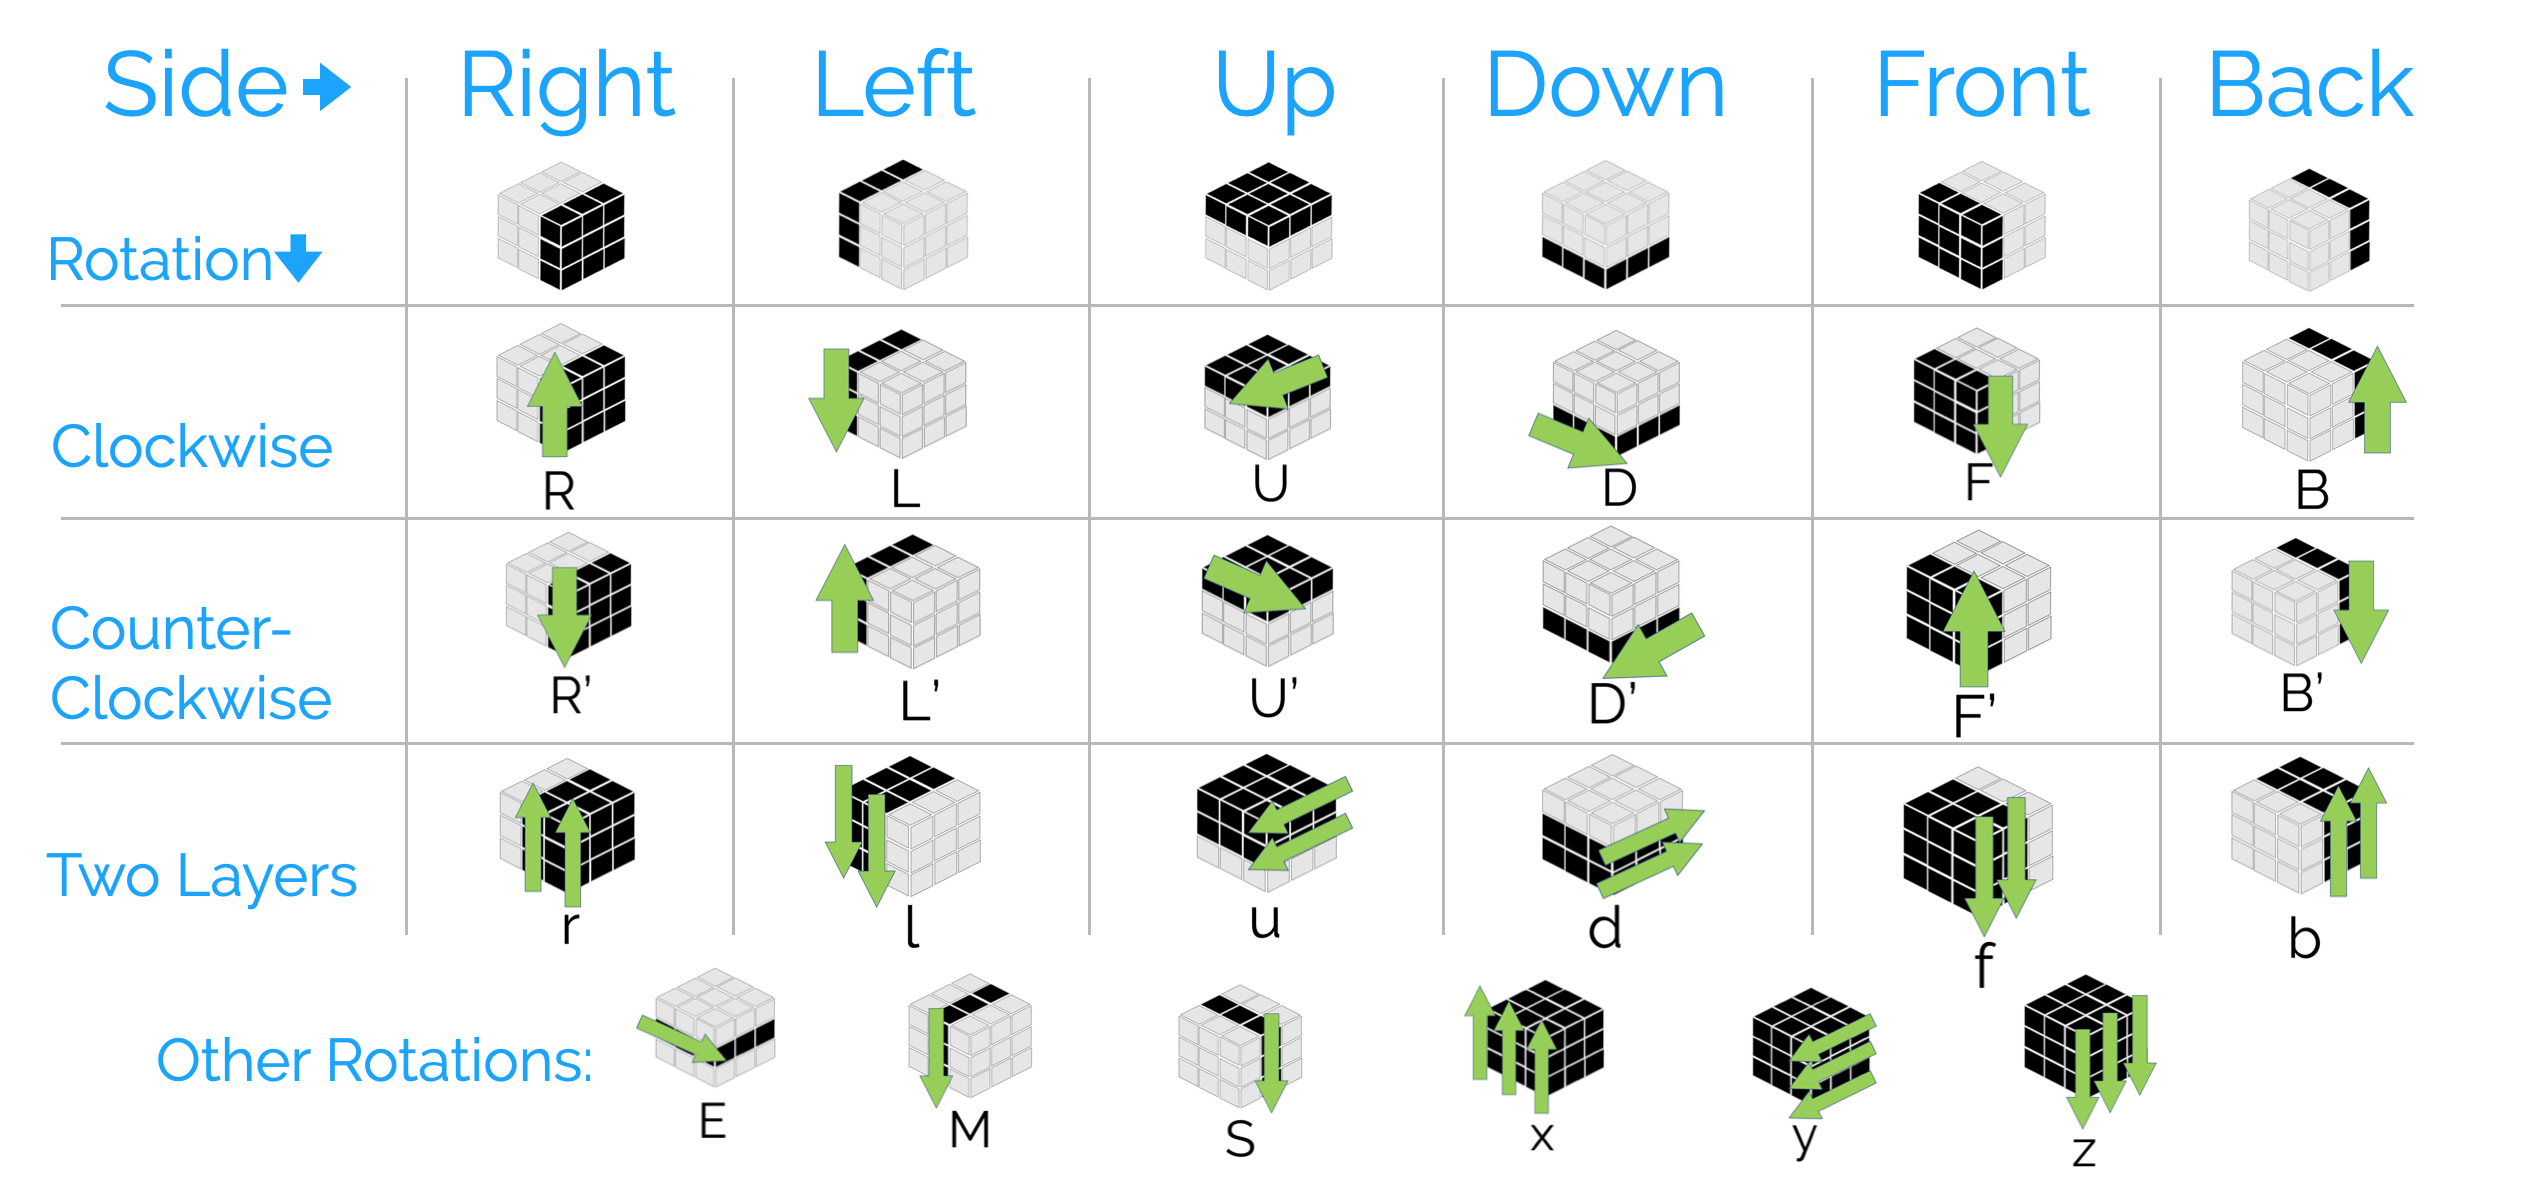
Before I can tell you how to do this, we are going to need some common language or terminology. When I received my first Rubik’s cube, I knew I would need some vocabulary to refer to and remember the moves as I learned them. Lucky for me, a common vocabulary already exists in the Rubik’s Cube world. The common notation used is often referred to as the Singmaster notation, which uses F, B, U, D, L, and R to represent sides and moves.
The Singmaster notation for the 6 sides to the cube
- F – front side
- B – back side
- U – up side
- D – down side
- L – left side
- R – right side
It’s interesting to note here that there are actually alternative notations, terminologies, languages. One of these makes all algorithms into pronounceable words. It’s called the Wolstenholme notation which replaces U with T; adds O, A, and I for clockwise, anticlockwise, and twice (180-degree) turns, & C means rotating the entire cube. For example LOTA RATO LATA ROTI is the equivalent to LU′R′UL′U′RU2 in Singmaster notation. And ROC is the clockwise rotation of the cube around its right face. Middle layer moves are denoted by adding an M and so forth.14
To solve the cube, we’ll rotate the sides one at a time until all 6 sides of the cube have one solid color each. The instructions to solve the cube are broken down into moves, algorithms, steps, and methods. You can think of these as analogous to letters, words, sentences, and paragraphs in writing.
- Move = letter
- Algorithm = word
- Step = sentence
- Method = paragraph
Let’s talk about each of these 4 parts of cube instructions in turn.
Moves
A move is simply rotating a side or section of the cube clockwise or counterclockwise either once or twice.
- CLOCKWISE (U) – To move one side clockwise, you just refer to the side to be rotated clockwise in relation to the rest of the cube while looking at it from the side referred to. For example if you saw the letter “U” in the instructions, you would rotate the upper side clockwise from the viewpoint of looking down on the upper side.
- COUNTERCLOCKWISE (U’) – If you see a capital letter, like U’, with an apostrophe in the instructions, you would turn that side counterclockwise while looking at that side. The apostrophe is pronounced “Prime”. For example, U’ is pronounced “you-prime”.
- DOUBLE TURN (U2) – If you see the number 2 in the instructions following a side notation, it’s the same as that side written twice, so you just turn it twice (UU = U2). You may never see 3×3 cube instructions to turn a side twice counterclockwise because turning twice clockwise is the same as turning it twice counterclockwise. It yields the same result. UU = U2 = U² = U’2. You similarly just turn that side around 180 degrees to face the opposite way.
- THREE TURNS – Doesn’t exist. You’ll never see UUU or U3. It doesn’t exist. Because it’s the same as turning it once in the opposite direction. UUU = U3 = U’. So, U3, just = once in the opposite direction.
- TURN TWO LAYERS – Sometimes you may see a lower case letter in the instructions. I don’t usually use any of these notations. If you see the lower case notation, it means to turn two layers at a time. For example, “u” would mean turning the top two layers clockwise. This is the same as turning the bottom layer counterclockwise, so I don’t see the point. Also, as you can imagine that u’ would mean to rotate those two layers in a counterclockwise direction.
- MIDDLE LAYERS – There are notations that can instruct you to just rotate the middle layers. These notations are M, E, and S. For M, you rotate the lawyers between L and R as if looking from above L. For E, you rotate the layer between U and D as if you are looking down on it from the D side. For S, you rotate the layer between F and B as if you are looking down in it from the F side. As you can imagine, adding a prime symbol, such as M‘, would mean to make those rotations in a counterclockwise direction.
- ENTIRE CUBE – There are also notations that instruct you to rotate the entire cube on one of the three axises. These notations are x, y, or z. They mean turn the entire cube on the x, y, or z axis while looking at the cube from the front. And, of course adding the counterclockwise rotation notation, such as x’, would mean to rotate the entire cube counterclockwise along the x-axis.
| Side | Right | Left | Down | Up / Top | Front | Back |
| Clockwise | R | L | D | U | F | B |
| Counterclockwise | R’ | L’ | D’ | U’ | F’ | B’ |
| Double | R2 | L2 | D2 | U2 | F2 | B2 |
| Two Levels | r | l | d | u | f | b |
| Two Levels CCW | r’ | l’ | d’ | u’ | f’ | b’ |
Other notations:
| Section rotated | Whole cube
x – axis |
Whole cube
y – axis |
Whole cube
z – axis |
Middle layer L&R | Middle layer F&B | Middle layer U&D |
| Clockwise | x | y | z | M | S | E |
| Counterclockwise | x’ | y’ | z’ | M’ | S’ | E’ |
Algorithms
When you string moves together, you get an algorithm. Algorithms are composed of a series of individual moves eg. RU2RU. Each algorithm helps you move a block, or number of blocks, from one location or orientation to another. For example, URU’R’ moves a forward-facing corner block on the top row to be downward-facing on the bottom row.
Algorithms are designed to manipulate target blocks without undoing solved blocks. This is done by constantly breaking and re-solving solved blocks. Algorithms can be done either opposite or backwards or both to achieve a complementary result. For example the last clockwise and counterclockwise moves. Particularly, those algorithms which have a commutator structure, namely XYX−1Y−1 (where X and Y are specific moves or move-sequences and X−1 and Y−1 are their respective inverses), or a conjugate structure, namely XYX−1, are often referred to by speedcubers colloquially as a “setup move”.
Repeating any algorithm over and over will return the cube to the state it was in before the algorithm. This not only allows for someone to practice an algorithm, but also undo one. However, sometimes it takes many many repetitions to return to the original state.
Is there a single algorithm that can solve any cube? Because, you can stop an algorithm partway through when you reach a desired result, it is possible to have an algorithm that rotates through every permutation of the cube. This theoretical algorithm is called the Devil’s Algorithm.15
You use algorithms to move blocks around and systematically solve the cube. The more algorithms you know, the faster you can solve the cube. I suggest you start with a few simple algorithms then learn more. The method described below uses 8 necessary algorithms and 5 bonus algorithms you can add shortly after to improve your technique.
Steps
You can put algorithms together to achieve a result such as solve a layer of the cube or parts of that layer such as corners or edges. A step is an algorithm or set of algorithms used to solve a pattern or level.
For example, one method (the one below) uses 2-3 algorithms to solve the middle layer of the cube. When you select the block to be moved, you get that block in place, use the appropriate algorithm, and perform the moves to get the block to the target location and orientation.
Methods
A method is a strategy of steps used to solve the entire cube. A method is composed of sequential steps or algorithms systematically designed to solve a block or so at a time until all 20 blocks are solved and the puzzle is complete.
These are all strategies that can be applied to any scrambled cube and produce a solved cube. It’s similar to a coin counter or selector when you put the coins in, and no matter what you put in, you get the same solution out the other side. Good methods will allow for each subsequent algorithm to leave all previously solved blocks solved, allowing you to systematically solve the cube block by block.
There are many methods out there. The most common method solves from the bottom to the top following a solution by David Singmaster. Some may start by solving all the corners first. There is a method by Lars Petrus which solves 2x2x2 sections of the block at a time. Some methods are simple to learn because they use few algorithms, but may ultimately take many more moves. Some have fewer moves, but more algorithms to memorize. I saw a method with only one algorithm, but took more moves in total and in the end was more complicated. Other methods are easier and quicker due to being able to complete most of the moves with one hand.
Also, these strategies don’t necessarily help you find the ultimate solution with the fewest moves. They just help you solve the puzzle a step at a time, and will likely use more moves than the ultimate solution for that scramble. The common method (layer by layer) we will learn has a minimum of 8 algorithms to learn and can solve the cube in about 100 moves.
Here’s an example of a cube scramble and the number of moves it might take to solve it.
Some created solutions using far less move 55 on average, but requires memorizing over 120 algorithms. One of these solutions commonly used by speedcubers was developed by Jessica Fridrich. This method is called CFOP standing for “cross, F2L, OLL, PLL”. Many speedcubers will memorize over 300 algorithms and study many methods to be able to solve the cube in seconds.
Here is a copy of the hundreds of algorithms required for the speedcubing methods as published by Gan cubes and comes with their cubes.
GAN Layer by Layer Guide: https://www.gancube.com/layer-by-layer-guide-of-gancube
GAN CFOP Guide: https://www.gancube.com/3x3x3-cfop-guide-of-gancube
Memorizing the steps and algorithms in any method enables you to solve any cube completely and independently. With more practice you’ll evolve from thinking through each move to solving from muscle memory and really fast times. Once memorized, the algorithms can be completed without even looking at your cube, so you can do it anywhere. This is how some people can solve the cube blindfolded. This is also great to know if a stray Phoenix gouges your eyes out and for some reason your life depends on you solving a cube.
So, remember, your instructions are broken down into parts.
Those are the parts of your solving instructions:
- Move = letter
- Algorithm = word
- Step = sentence
- Method = paragraph
Rubik’s Cube Techniques
Let’s talk briefly about tips and techniques. The mindset you want is to look at the cube in terms of blocks rather than stickers or faces. Take it a block or section at a time.
First, you want to hold it right. Most people hold the cube with the white down, which is how we’ll hold it when we solve it below. Face the front (F) side toward you where you can see the up (U) and right (R) sides visible. Keep your thumb and fingers on the center or levels you want stationary during the move.
In the method below, we will also have the yellow center up and the white center down. However, once you get the hang of it, it doesn’t matter what color you use. The colors are just variables. Some Rubik’s cubes have many different colors or even pictures.
Analyze the blocks you can see. Holding it like this, you can only see a maximum of 19 blocks at a time. As mentioned before, there are 26 blocks. However, you can guess some of the other 7 blocks you can’t see. Three of those will be center blocks, one will be a corner, and two will be edges. And this may also help you solve the block without turning it and reduce your time.
As you learn to solve the cube, start off by referring to your notes as you solve the cube, then memorize one algorithm at a time until you can do it without looking. First, work on solving it by yourself without needing to refer to your notes, then work on improving your time with those algorithms. You can then search online for more advanced algorithms or methods.
Something that worked for me when I was memorizing was to create a short-term language to make things quicker. I converted all the notations into one-syllable instructions. It made it easier for me. For example, for counterclockwise moves, I add a “t” instead of “prime” and for double moves, I add d instead of “double” or saying it twice. For example, for U’, saying “you-prime” takes too long, so I add “t” on the end, and say, “yout”. So, I just utter one syllable per move. That helps me memorize the moves quicker. You don’t need to try this. It’s just something that worked for me in the beginning.
Like this…
| Side | Clockwise (N) | Counterclockwise (N‘) | Double (N2) |
| U-upper | You | Ute | You’d |
| R-right | Are | Art | Arred |
| F-front | Eff | Fart | Fard |
| B-back | Be | Bert | Bead |
| L-left | Elle | ‘Elt | Lard |
| D-down | Dee | Dirt | Dard |
Get Yourself A Cube
The first thing you need to do is get a cube. You can pick one up at the grocery or toy store or order one online. You can also download a free virtual cube to practice on while you wait for your physical cube. I have some suggestions for apps for your smartphone or smartwatch (you can see that at the end of this in the resource sections).
Of course, you will want a physical cube (the virtual cubes are just … not the same). I suggest you start with one of these cubes:
- Rubik’s cube – https://amzn.to/38Tjh11
- Affordable and the traditional cube, but is heavier and not as smooth as the speed cubes
- Mini cube – https://amzn.to/3pwJfNQ
- Awesome little cube only a inch cube allows you to carry it anywhere and practice anywhere
- Speed cube – https://amzn.to/36J5AiF
- Smoothe and easy. It also springs out to allow you to move the layers even if they are not completely aligned. When this improved equipment came out, solve records dropped.
- Magnet cube – https://amzn.to/38ZddnI
- This is essentially a speedcube with magnets to ‘snap’ the cube into place between moves making smooth solving easier. This innovation also spurred an increase in new solve times.
- Mixed cubes – https://amzn.to/3lJACgw
- Of course, you can get a whole set of cubes and cube variations. The 2x2x2 and the triangle pyramid is also fun to play with (and easier).
- Cube-solver robot – https://amzn.to/35ETYhr
- This just looks cool. I would love to buy it, but haven’t yet. If you end up buying it let me know how you like it.


You’ll want to use these links, so you get the right stuff and not some knock off stuff you regret buying. You also get the added pleasure of knowing that you support this content as most of the links I suggest here are affiliate links that pay me a commission even though you pay the same price you would if you were to search for the product yourself.
When you get your cube, it will almost always come with directions to solve it, for now just keep those somewhere for reference later. You’ll likely find they are either similar or the same as what we’ll review here.
Let’s go over the basics of the cube.
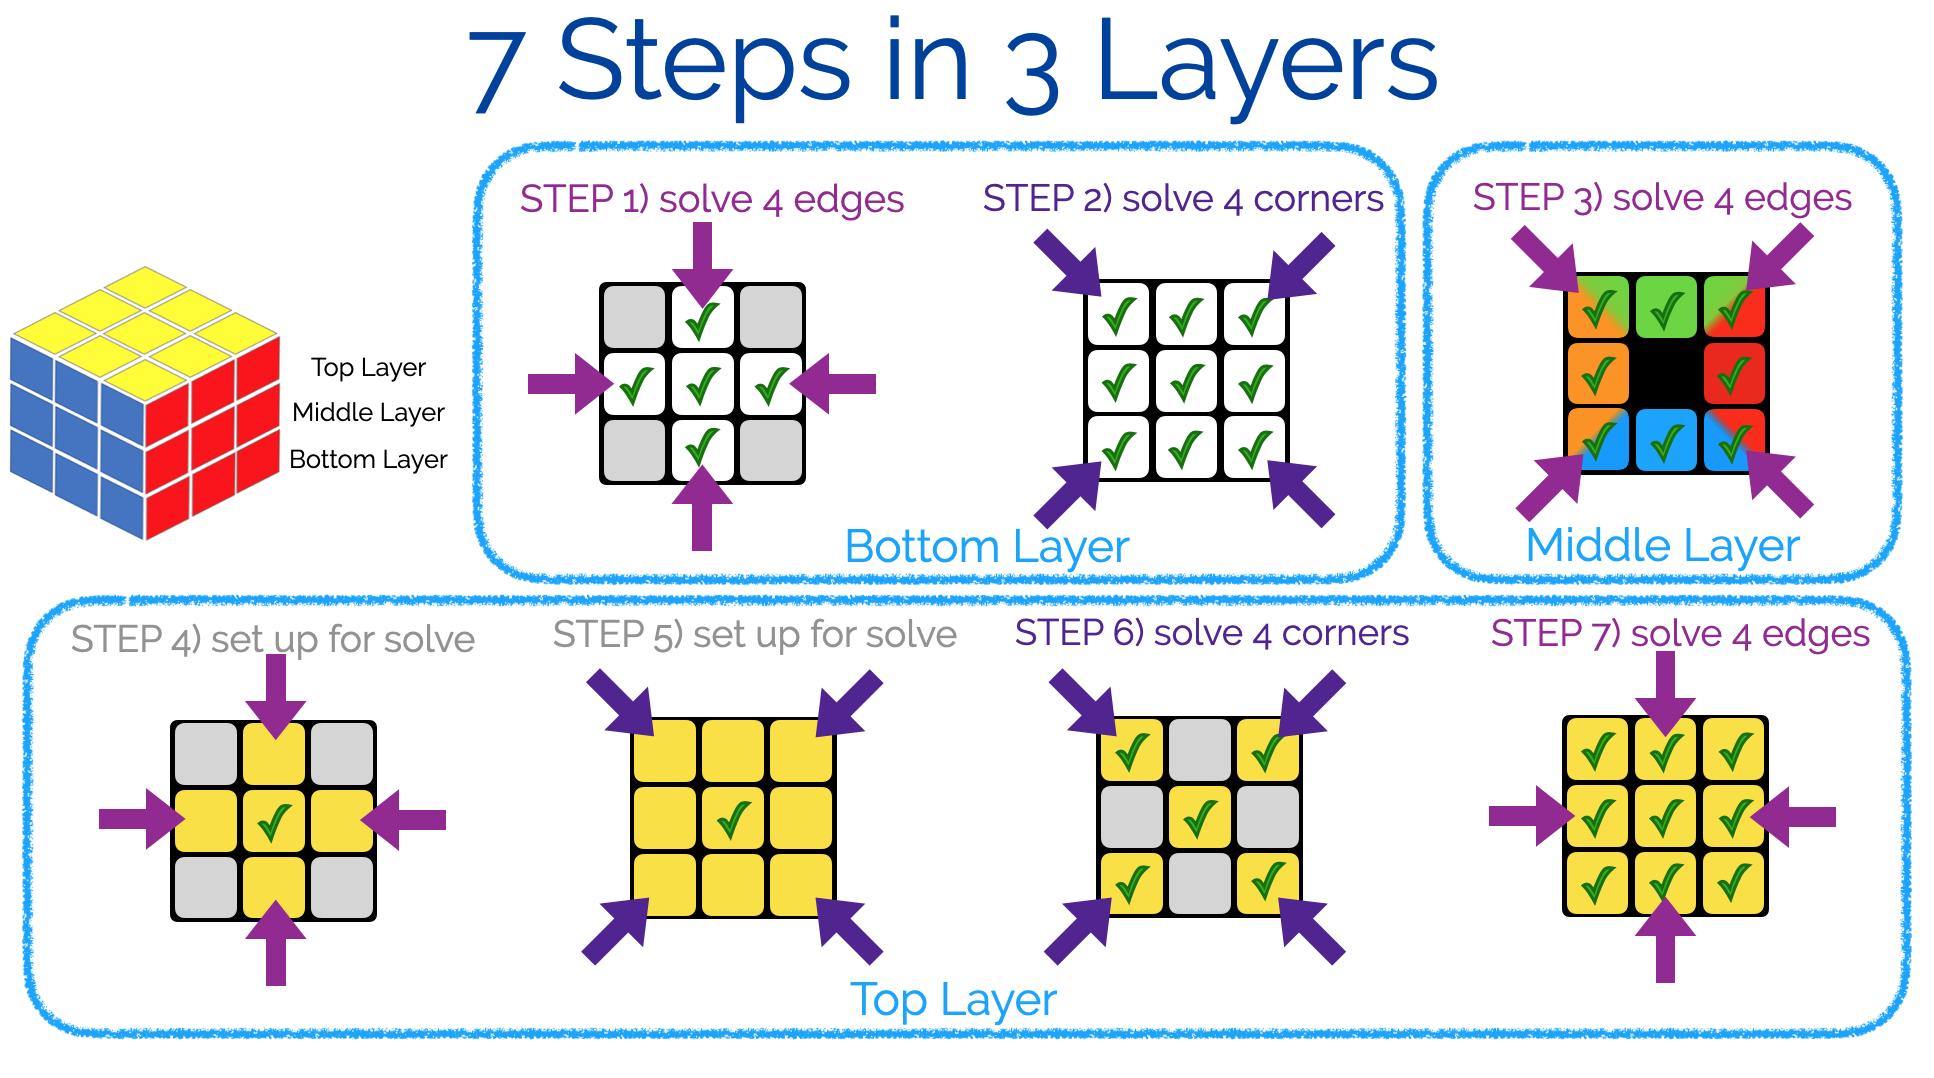
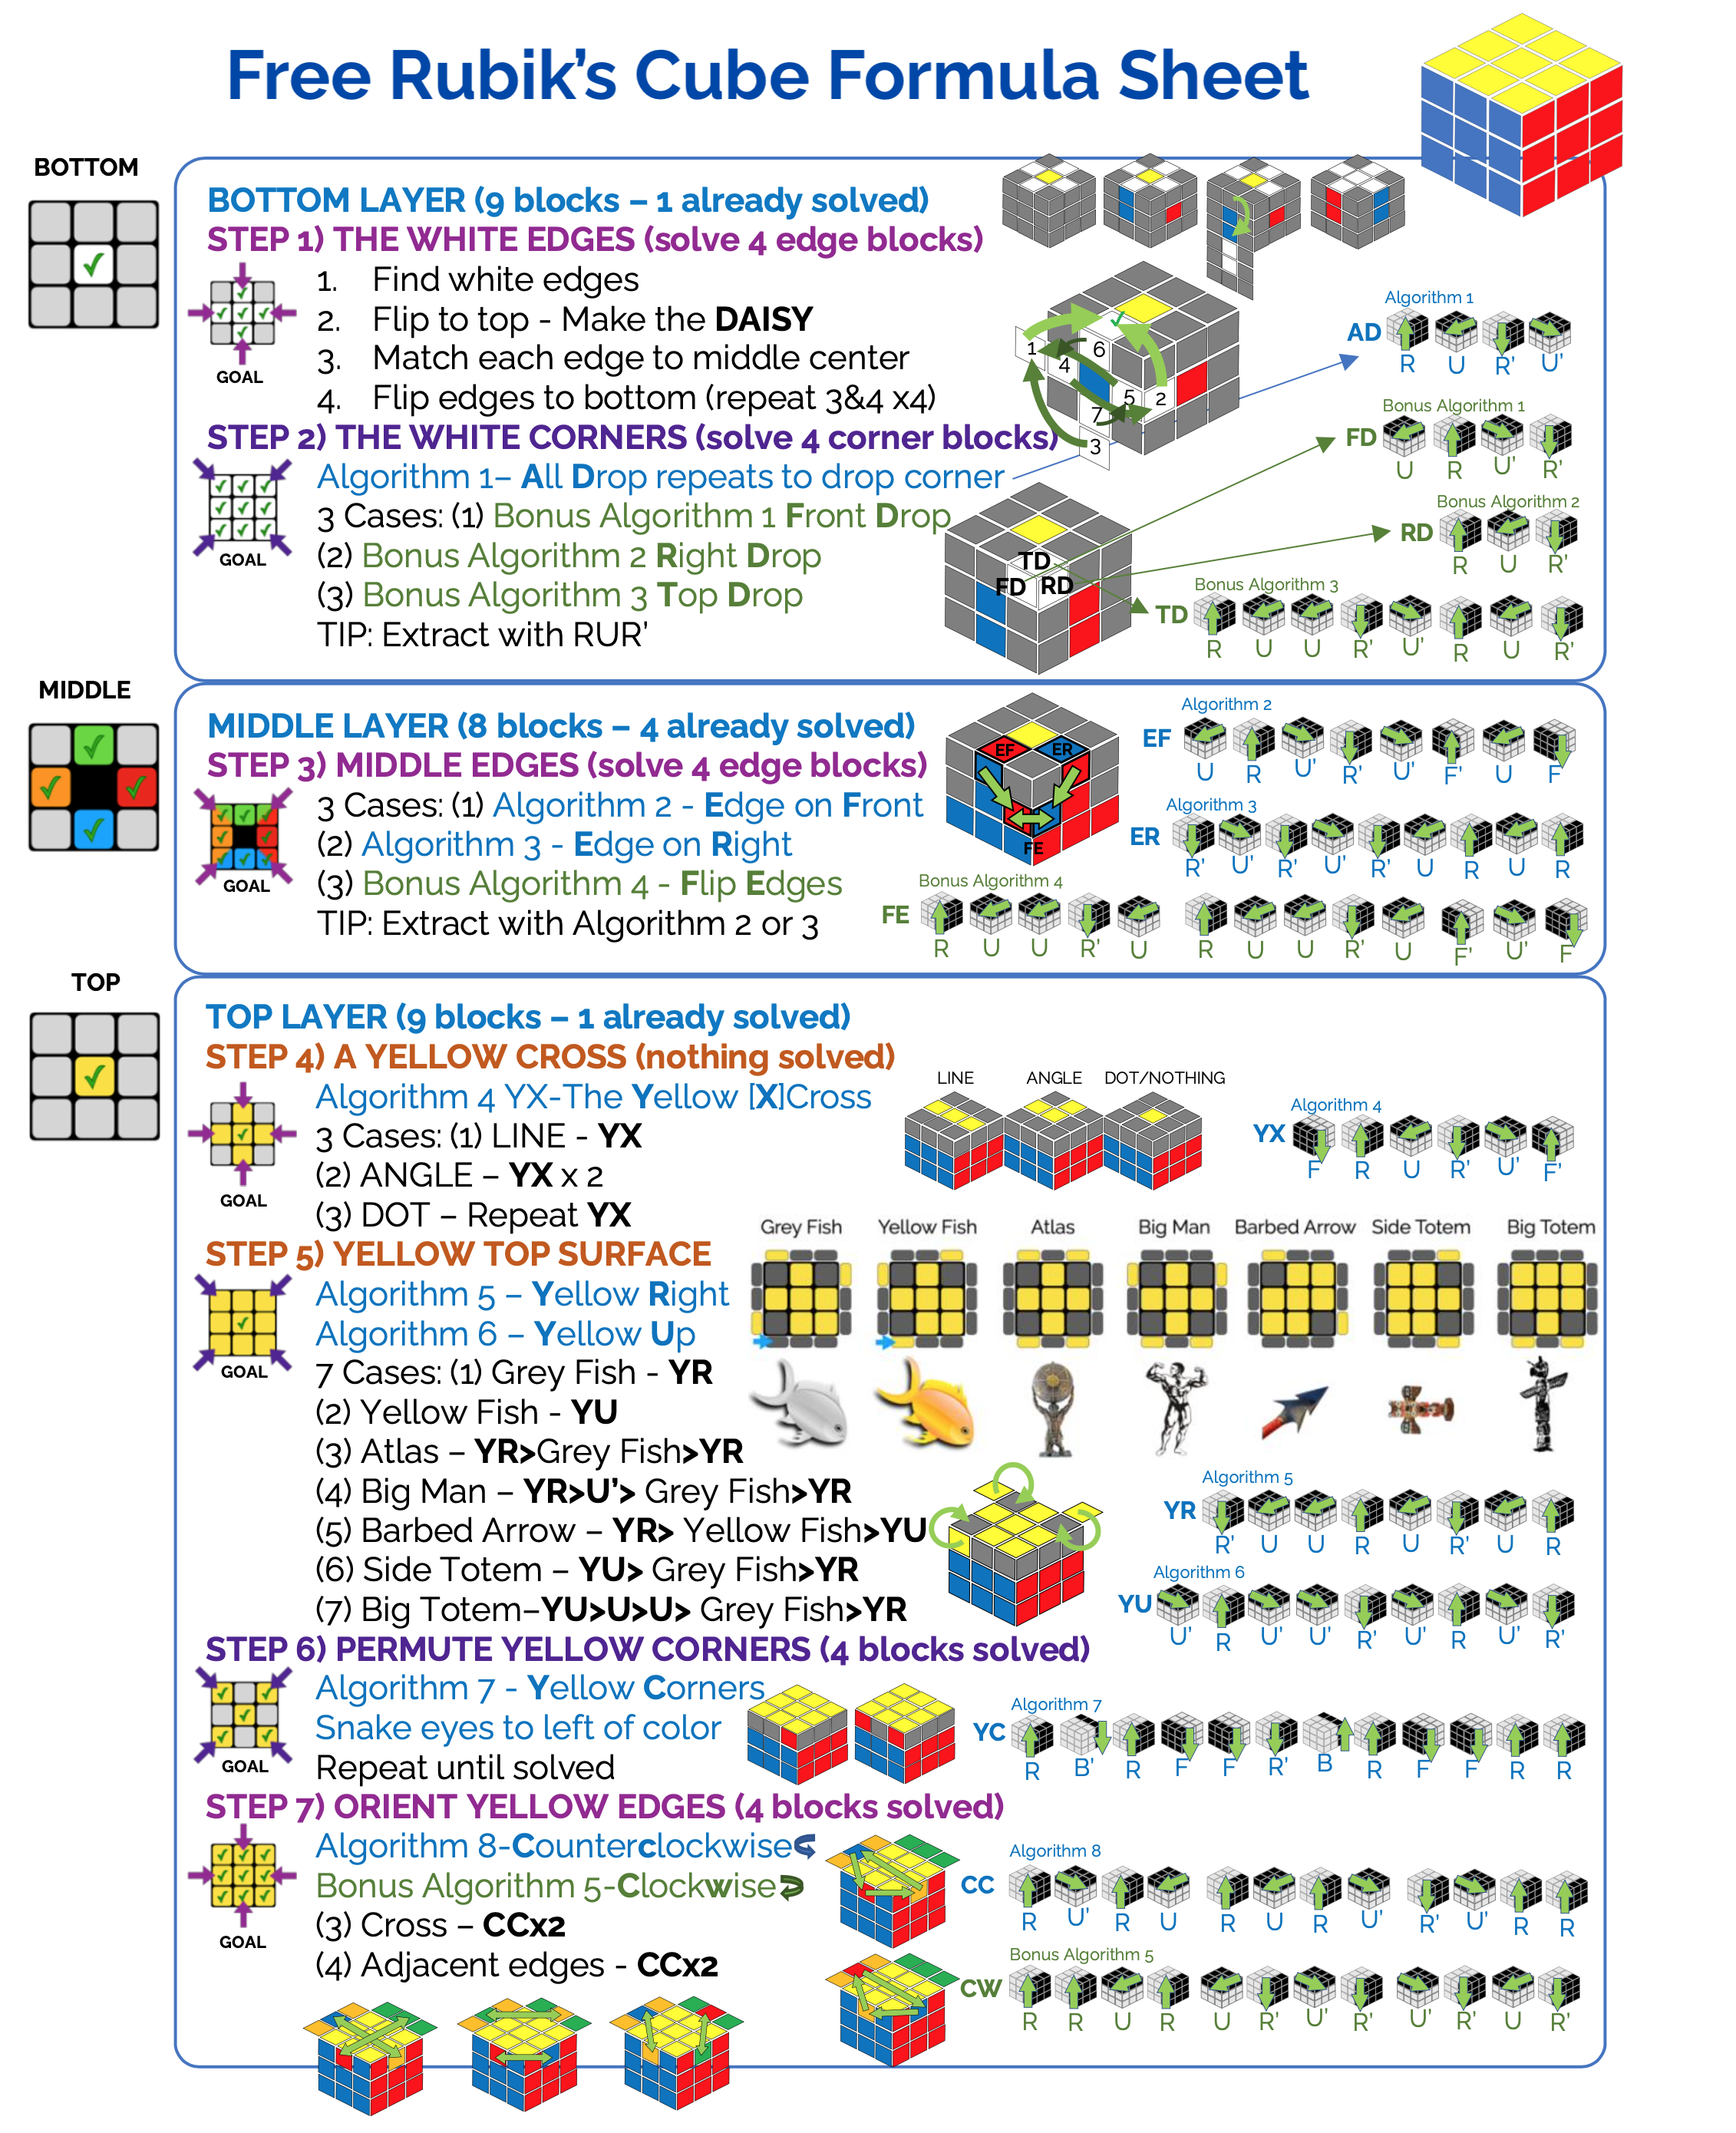
7 Steps To Solve The Cube

Let’s talk about the method we’ll be using. When there are many different methods out there, how do you know, or how do you choose? We’ll, you might just try the method that came with the cube if it came with an instruction packet. You might search online. I did both. Here are the reasons I choose this method:
-
- POPULARITY – It seems to be a popular method at least for serious beginners. And I’ve tried to simplify it to make it easier to use and remember. But, it’s the same method that came with the cube, and it is readily found online. It’s the layer-by-layer method that was first popularized by David Singer.
- SIMPLE – Any method you choose will solve your cube. But you’ll want something simple to perform. If the instructions switch back and forth between hands like a left side rotation followed by a right side rotation, performing the moves will not only become more complex, but will take more time. This method uses mostly U and R for the algorithms with some F and B moves here and there, but there are no D or L moves, which makes it possible to perform almost all moves with one hand while holding the cube with the other. There are also no instructions including x,y,z instructing you to spin the cube or, M,S,E rotating the middle layers. So, by focusing all the instruction on just a few types of moves, it makes the solution very simple to learn and perform.
- SYSTEMATIC – The method focuses on moving a few blocks or a block at a time, so you can systematically move up through the cube. Also, each step you go through will not disturb the layers already solved.
- BALANCED – Although this method is NOT the easiest to learn, it balances memorization with intuition. Methods that use less algorithms tend to have many conditional elements to remember making it more complicated. This method has less conditions to remember than other methods, although there will always be something to memorize. It has fewer moves (under 100) than purportedly “simpler” methods. I’ve seen a method that claims to use only two algorithms, but then combines them in so many ways, you end up not only memorizing all the different ways of combining those two algorithms, but also you end up doing more moves in the end.
- BEGIN – Can you eventually learn to solve the Rubik’s Cube in less than 5 seconds using this method? Probably not. If the steps needed here are on average about 100, and a speedcuber can do 15 moves a second, you might get your time down to under 10 seconds with lots of practice. But you may need to learn a more advanced system like OLL … which would require memorizing about 200 algorithms. So, this is a good place to start, then you can move on from there.
- REMEMBER – This method is pretty easy to remember.
- There are 3 sections: bottom, middle, and top.
- Blocks are solve in 5 sets of 4 blocks each
- Bottom
- 4 edges
- 4 corners
- Middle
- 4 edges
- Top
- 4 corners
- 4 edges
- Bottom
- 7 Steps
-
-
- Because the last two steps require a set up, we add two more steps to the 5 solving steps for a total of 7 steps. That’s not much to remember.
-
- 8 Algorithms
-
- You only need to remember 8 necessary algorithms to solve the entire cube.
- However there are 5 bonus algorithms you can immediately add to your repertoire once you master the necessary algorithms.
- NECESSARY ALGORITHMS
- Algorithm 1: RUR’U’ – Repeat for All White Corners to Drop (AD)
- Algorithm 2: URU’R’U’F’UF – Drop Colored Edge on Front (EF)
- Algorithm 3: R’U’R’U’R’URUR – Drop Colored Edge on Right (ER)
- Algorithm 4: FRU R’U’F’ – Repeat to make the Yellow [X]Cross (YX)
- Algorithm 5: R’U2RUR’UR – Yellow Surface Beginning with Right (YR)
- Algorithm 6: U’RU’2R’ U’RU’R’ – Yellow Surface Beginning with Up (YU)
- Algorithm 7: RB’RF2 R’BRF2 R2 -Solve Yellow Corners (YC)
- Algorithm 8: RU’RU RURU’ R’U’R2 – Rotate Yellow Edges Counterclockwise 🔄 (CC)
- BONUS ALGORITHMS
- Bonus Algorithm 1: URU’R’ – Drop Corner with White on Front Down (FD)
- Bonus Algorithm 2: RUR’ – Drop Corner with White on Right Down (RD)
- Bonus Algorithm 3: RU2R’U’RUR’ – Drop Corner with White on Top Down (TD)
- Bonus Algorithm 4: RU2R’U RU2R’U F’U’F – Flip Colored Edge (FE)
- Bonus Algorithm 5: R2UR UR’U’R’ U’R’UR’ – Rotate Yellow Edges Clockwise 🔁 (CW)
Let’s overview the steps in the method…
LAYER#1-BOTTOM LAYER (9 blocks – 1 already solved)
GOAL: Solve all the blocks on the bottom layer.
The cube is broken down into layers (bottom, middle, and top). We start by concentrating on the bottom layer, the white layer. This layer already has one cube solved by definition, the white center block. So you need to solve 8 blocks: 4 white edges and 4 white corners. Those are the only 9 blocks with white in them.
Just a note in the diagrams and images, grey block surfaces are surfaces that may appear as any color on your cube.
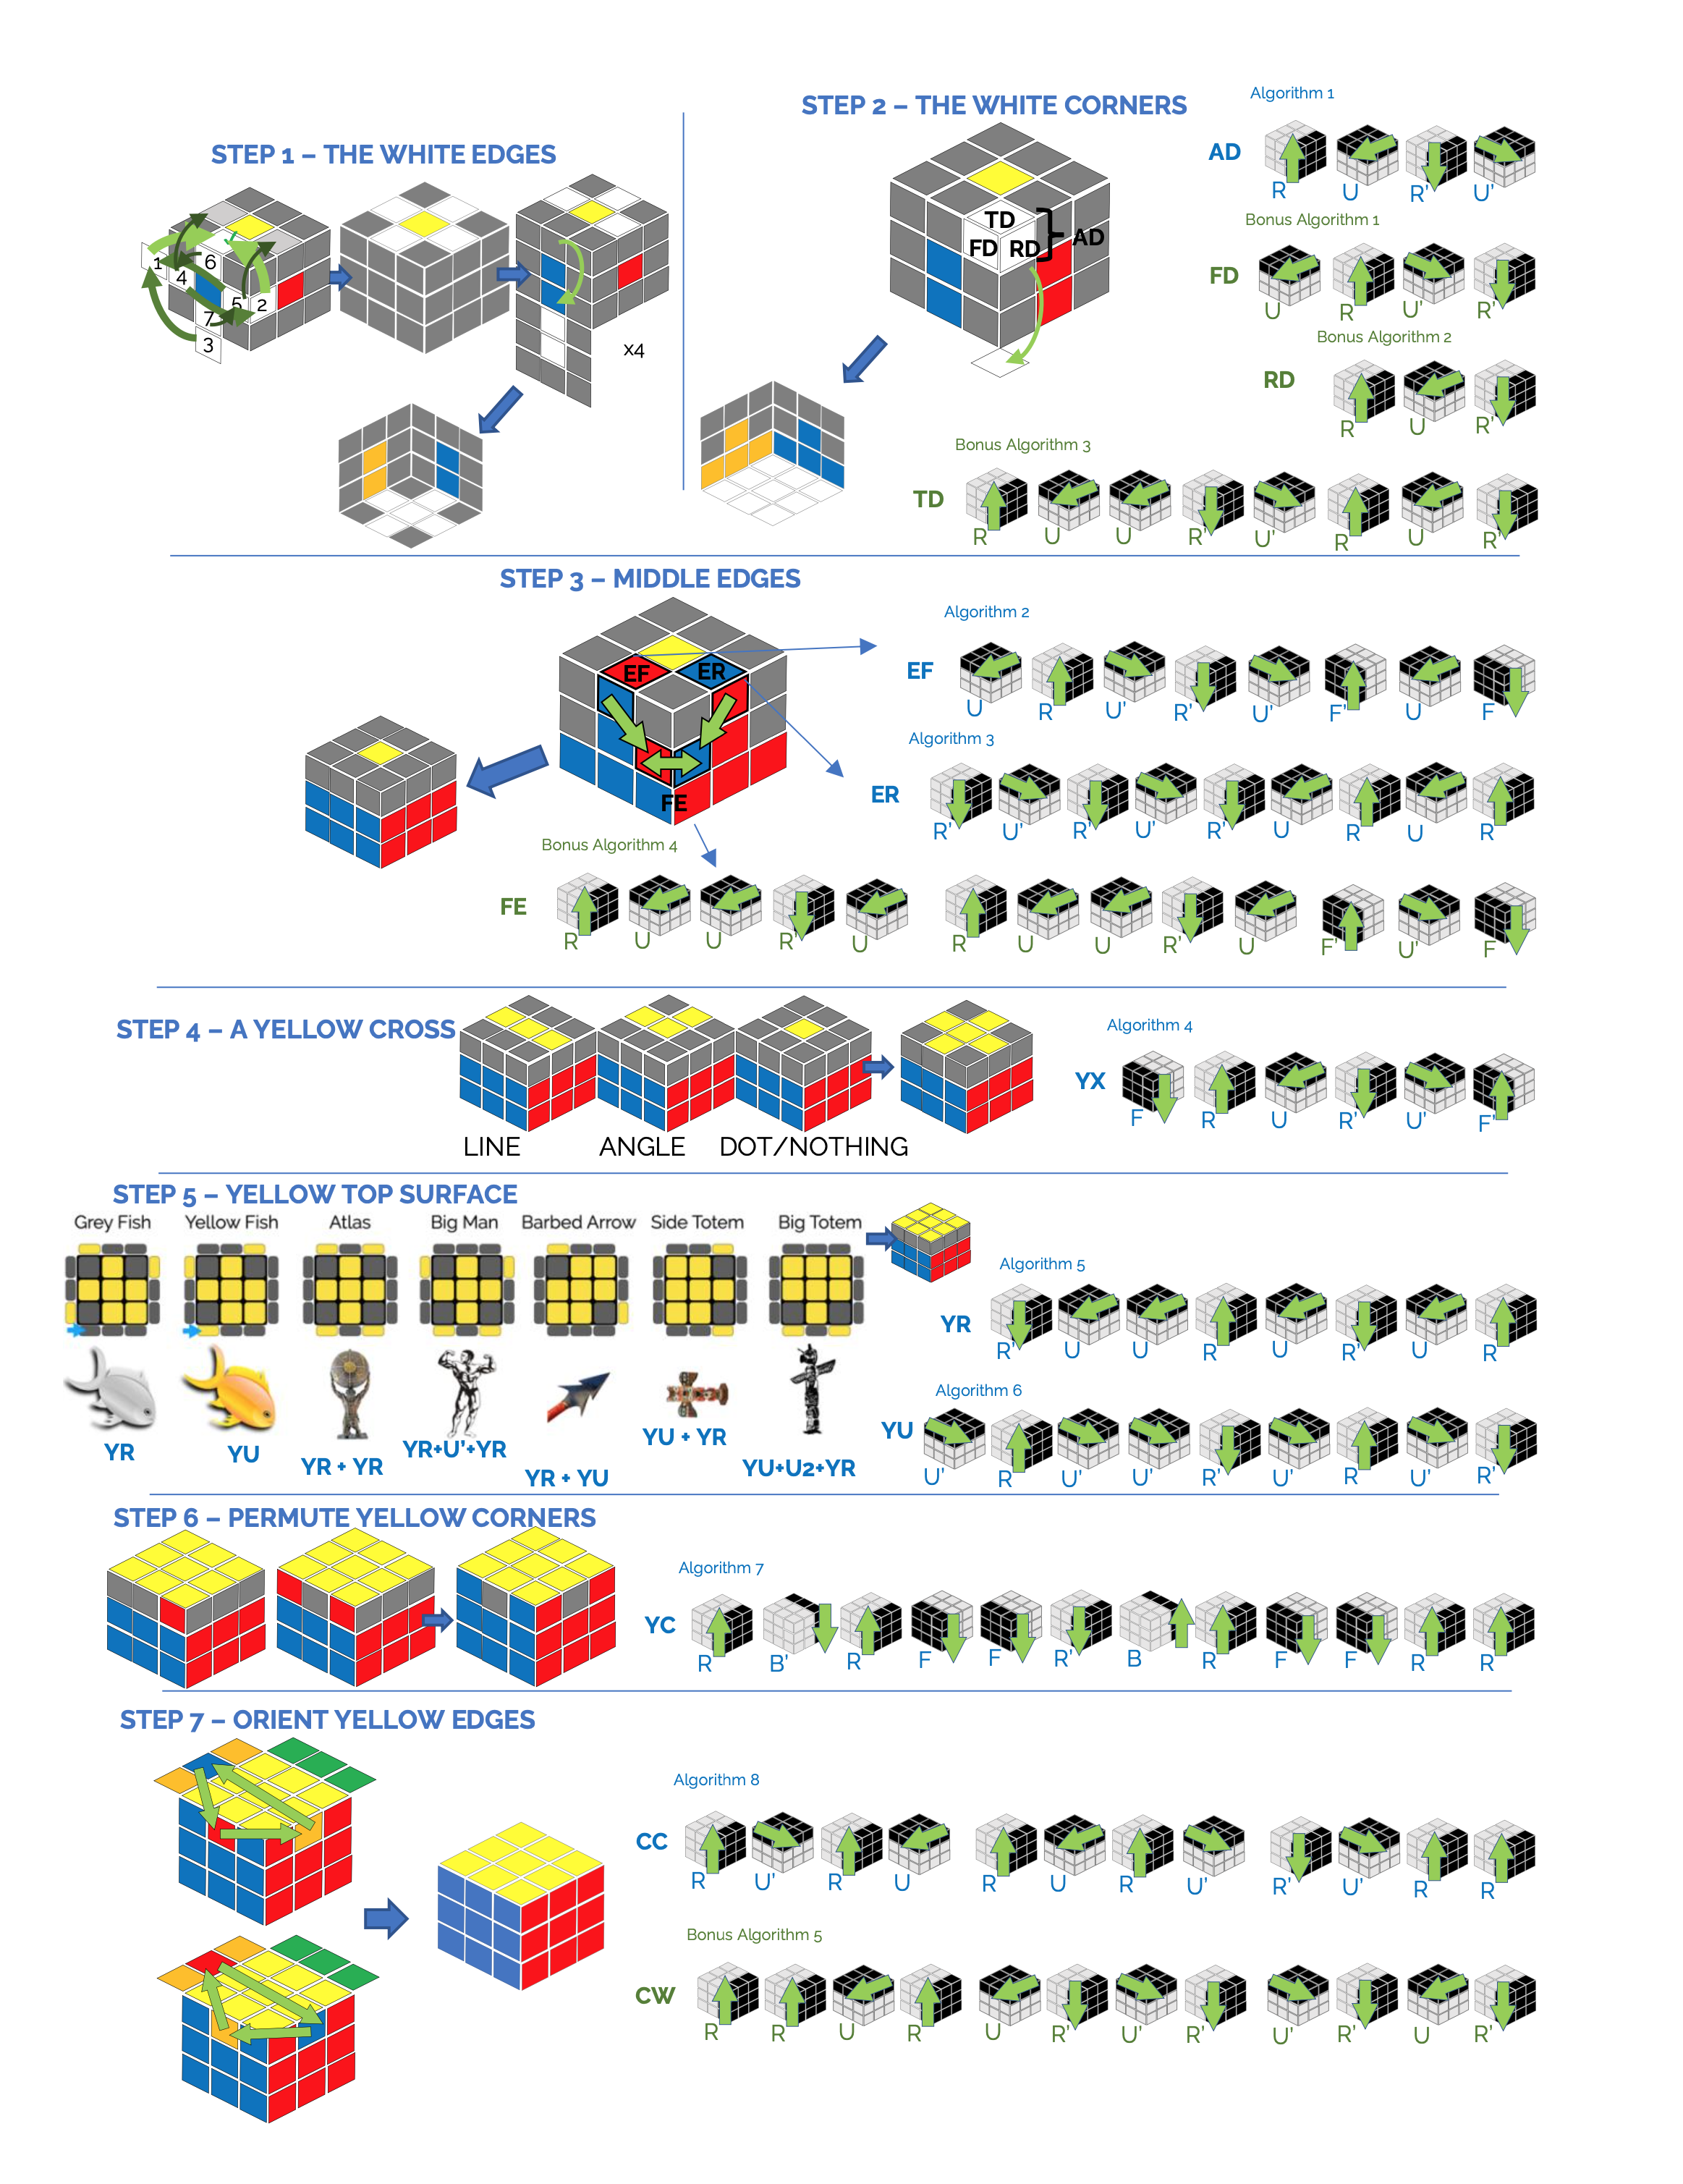
STEP 1) THE WHITE EDGES (solve 4 blocks)
GOAL: Solve all 4 white edges.
The first step in the process is to solve for the white edges. This step has 2 parts to it: (1) making the daisy, and (2) flipping the edges down. We start with the daisy because if you try to flip these edges to the bottom, you may end up undoing the blocks as you solve them, so the simplest way is to set up all the edges and then move them into place.
First, the daisy is the 4 white edge blocks around the top yellow center block. The yellow center block is the middle of the daisy flower and the white edges are the petals.
Making the daisy is easy. So easy, in fact, that many sets of instructions just tell you to manipulate your cube to create the daisy without any instructions of how to do that. I’ll endeavour to give you some simple instructions here. The simplest way to get the white edges to the top surface is to move them to the middle layer, put that side under a target top edge, and then move that up to the top.
There are only 7 cases where you can find a white edge in relation to a target location on the top surface. You probably don’t need this instruction, but here it is anyway, so you can see how easy this part is. You simply need to move the blocks in relation to the white edge surface to the top. At this point, it doesn’t matter what color is on the other side of the white edge. Just get the white surface to the top adjacent to the yellow center block. Repeat until all the white edges are on the top layer.
7 Cases for white edge locations*:
- >✓ (F)
- >✓ (F’)
- >2>✓ (F’2)
- >2>✓ (dF’)
- >1>✓ (d’F)
- >4>2>✓ (Fd’F)
- >5>1>✓ (FdF’)
*Where d means rotating the entire bottom two layers clockwise or counterclockwise or F where you are rotating the front layer.
Second, you will want to flip the edges to the bottom one at a time. Once you have your white daisy, take one petal (white edge) at a time, and rotate the top (or the bottom two layers) so the adjacent color on that white petal or edge matches the center block on the middle layer.
Then, looking at the matched center block and white edge block, twist it 180 degrees to the bottom or perform the moves F2.
Once you have done this for all 4 white edges (or petals), all the white edges will be on the bottom matched with both the white center and the colored middle center blocks. If this is the case, you have solved the 4 white edge blocks.
If your cube looks like this, you can move on to Step 2 and solve the first layer.
NOTE: All the steps and algorithms performed throughout the remainder of the method will leave the blocks that you have solved in their solved-state. Four blocks solved, sixteen to go.
STEP 2) THE WHITE CORNERS (solve 4 blocks)
GOAL: Solve all 4 white corners.
The second step of the seven steps finishes the entire bottom layer by solving the 4 white corners. You actually only need one algorithm for this step. And I recommend just starting there. Once you can solve the cube with the 8 necessary algorithms, it will be helpful to memorize the 3 bonus algorithms here.
- Algorithm 1: RUR’U’ – Repeat for All White Corners to Drop (AD)
- Bonus Algorithm 1: URU’R’ – Drop Corner with White on Front Down (FD)
- Bonus Algorithm 2: RUR’ – Drop Corner with White on Right Down (RD)
- Bonus Algorithm 3: RU2R’U’RUR’ – Drop Corner with White on Top Down (TD)
- TIP: Extract stuck blocks with RUR’ (Bonus Algorithm 2)
You can solve ALL the corner blocks with Algorithm 1 RUR’U’. To set up these algorithms find a white corner (one at a time) and position it above the target location where you need the block to be. This sets up the algorithm. Then while holding the cube with the corner in both the Front (F) and Right (R) sides, perform the first algorithm, RUR’U’, over and over until the corner ends up in the correct position and correct orientation.
The three bonus algorithms can make the process easier. You don’t need to memorize these until later in your learning process, and they will completely replace Algorithm 1 when learned. Using these three algorithms enables you to solve these 4 blocks with far fewer moves, but requires just a little more learning. But if you want, you can start with memorizing these rather than Algorithm 1. They are used in a similar way. Once you place the target corner block over the target location, just identify whether the white face is on the top, the right, or the front. Then use the matching bonus algorithm to move the block down to the right location with fewer steps.
Whether you use Algorithm 1 or the three bonus algorithms, once completed, the block will be in location.
Block solved!
You may need to extract blocks that are stuck in the wrong location. Every once in a while a white corner block you want to manipulate is NOT on the top level. That is, it is stuck in the bottom layer, but in the wrong spot, or the wrong orientation, or both. Extract them with the shortest bonus algorithm for Step 2, which is Bonus Algorithm 2 (the Right Down one) RUR’.
EXTRACT THE STUCK WHITE CORNER BLOCK
or!
You just need to repeat these parts for each white corner until the cube is solved.
TIP FOR SELECTING ORDER OF BLOCKS SOLVED
The order of blocks you choose to solve in this step can make a difference in the number of moves you make. So, here are some tips to make things quicker. Focus on the white corner blocks in the upper layer first, as solving those will likely dislodge these stuck blocks. And chances are you may not need to deal with a stuck block at all. Of the white corner blocks in the top layer, focus on those with the white face on the front or right face, as those take fewer moves. Then move to the top faced white corner blocks. If you have already moved all the white corner blocks from the top layer, and there still remains an unsolved block(s) stuck in the bottom layer, then extract the stuck blocks and solve accordingly.
Systematically move through the white corner blocks until they are all done.
Bottom layer solved!
Eight down, twelve to go.
LAYER#2-MIDDLE LAYER (8 blocks – 4 already solved)
GOAL: Solve all the blocks on the middle layer.
With the bottom layer solved, you’re ready to move on to solving the second or middle layer. There are 8 blocks in this layer (because of course your 3×3 cross section doesn’t include any inner block). However, the middle layer comes with 4 of those 8 blocks already solved – forever and all eternity! By definition, the center blocks are ALWAYS in the right position and orientation. Therefore you only need to solve the color edge blocks (all the edge blocks that don’t include yellow or white).
STEP 3) MIDDLE EDGES (solve 4 blocks)
GOAL: Solve all 4 middle colored edges.
The 4 edge blocks you want are either in the top layer or in the middle layer. If the block is in the middle layer it may be either in the right place and orientation, which means it’s solved, or the wrong place or wrong orientation or both.
The 4 colored middle edges:
- Blue – Red
- Blue – Orange
- Red – Green
- Green – Orange
You only need 2 algorithms to solve this middle layer, but there is a bonus algorithm to help you flip edges that are in the right place but the wrong orientation. You can reach the same result by using one of the other two algorithms to extract the misaligned block and then replace it with the appropriate algorithm.
- Algorithm 2: URU’R’U’F’UF – Drop Colored Edge on Front (EF)
- Algorithm 3: R’U’R’U’R’URUR – Drop Colored Edge on Right (ER)
- Bonus Algorithm 4: RU2R’U RU2R’U F’U’F – Flip Colored Edge (FE)
- TIP: Extract stuck (disoriented) blocks with Algorithm 2 or Algorithm 3
First, find the colored edge blocks. We’ll deal with them one at a time. When you locate the edge, move it adjacent to the target location while matching one of the sides of the block with a center block in the middle if possible. There are only 3 possible cases:
- The edge will be on the left of the target location, (EF)
- The edge will be on the right of the target location, or (ER)
- The edge is the right place, but oriented incorrectly (FE)
Block set up for move.
Once the block is in place, perform the appropriate algorithm from the list above. Repeat this for each of the 4 middle edges.
You only need to start out memorizing the first two algorithms. If you encounter a block that needs to be flipped and haven’t memorized the bonus algorithm, use one of the other algorithms to extract the block by replacing it with a non-solving yellow-edged block. Then get that block in place and use one of the two algorithms to put it in place.
Twelve down, Eight to go.
LAYER#3-TOP LAYER (9 blocks – 1 already solved)
GOAL: Solve all the blocks on the top layer. And solve the entire cube.
Solving the top layer is tricky because the previous layers need to remain solved. That means there are fewer blocks that can be manipulated. This last section has 4 steps (Steps 4-7). But the first two steps in this section (Step 4 & 5) don’t actually solve any blocks. They merely set up the top layer, so you can use the last two algorithms or so to solve it.
This layer has nine blocks in it, but the yellow center is solved by default. So, that means there are only 8 blocks to get in the right place and the right orientation.
STEP 4) A YELLOW CROSS (nothing solved – set up only)
GOAL: Position yellow faces in a cross.
The goal of Step 4 is to move the yellow edges into a yellow cross on the top. They don’t need to match the lower two levels, so those two layers can be oriented in any direction and it won’t affect the following algorithm.
Did I say, algorithm? Yes. There is only one algorithm for this step. But you may need to perform it over and over. The key to getting this algorithm to work is to orientate the top layer. It really doesn’t matter how the bottom two layers are oriented.
From time to time, you may get to this step and find that you already have a cross. In that case you simply skip this step.
- Algorithm 4: FRU R’U’F’ – Repeat to make the Yellow [X]Cross (YX)
- LINE – A4x1 Facing parallel to F
- ANGEL – A4x2 Facing away from FR corner (1x > line)
- DOT – A4x2 U A4
LINE – If the face of the top layer has a line that goes through the center, you’ll want to hold the line parallel to the front and back sides with the line going from the left edge to the right edge.
ANGLE – If the face of the top layer has a right angle made of three blocks with the angel bending in the center block, you’ll want to hold the cube with the angle moving from the left edge to the center to the back of the cube.
Then perform the fourth necessary algorithm, FRU R’U’F’ over and over until there appears a yellow cross on the top face of the top layer. You may have to perform the algorithm a few times.
If there is nothing (neither a line nor an angle), you just need to perform the algorithm until you get either a line or an angel.
When you are done, you will have a yellow cross on the top. There may also (and likely will) be other yellow faces on the top as well (there are 7 possible permutations as you will see below). Also, these 4 edges are not yet solved, but they will help get your cube in a position to use the algorithms in the last two steps to solve the last layer.
STEP 5) YELLOW TOP SURFACE (nothing solved – set up only)
GOAL: Position Yellow edge pieces, so to form a top yellow surface (unsolved).
In rare circumstances, you may arrive at this step with a yellow surface already completed. If that happens, simply skip this step and go on to the next step.
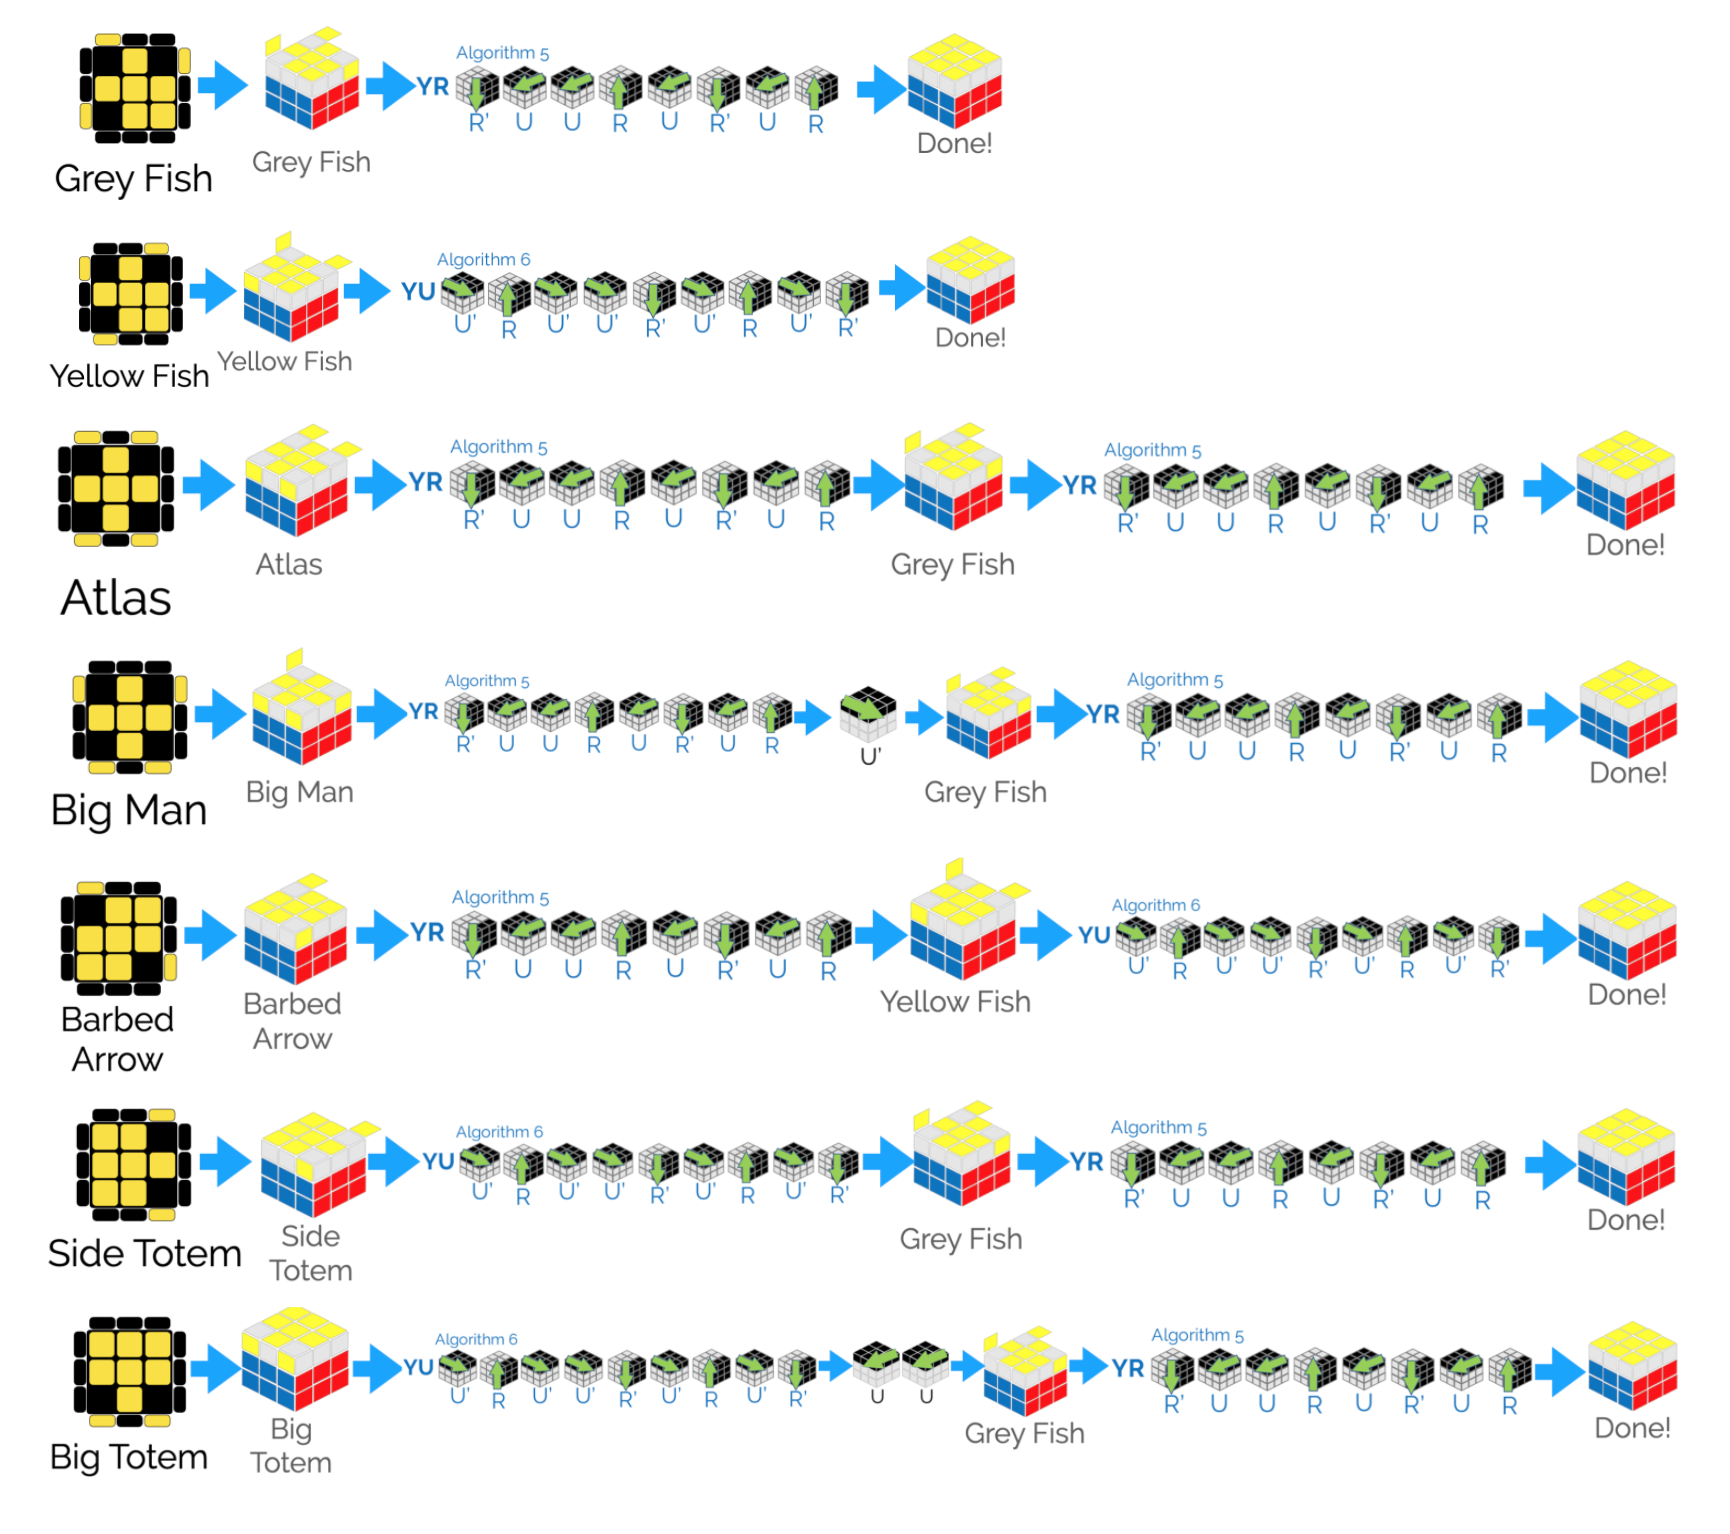
This step only has two algorithms. But, it has seven possible cases. It is your job to identify the case and apply the algorithm or algorithms in the right order. If done correctly the algorithms will move the either 3 or 4 faces to the top. Once the top is a complete yellow face, it opens up the possibility for the algorithms used in the last two steps. Without those tight algorithms, solving the last layer is difficult without disturbing the first two layers.
- Algorithm 5: R’U2RUR’UR – Yellow Surface Beginning with Right (YR)
- Algorithm 6: U’RU’2R’ U’RU’R’ – Yellow Surface Beginning with Up (YU)
Out of the seven possible cases, there are two basic patterns that look like fishes. You will need to get your cube to one of these two fishes, then the appropriate algorithm will finish this step.
Many methods also refer to these seven cases and have different ways of remembering them. Here are the mnemonic devices I came up with.
Seven Cases Possible:
- 1) Grey Fish: 5 (Grey Fish >YR> Yellow surface)
- 2) Yellow Fish: 6 (Yellow Fish >YU> Yellow surface)
- 3) Atlas: 55 (Atlas >YR> Grey Fish >YR> Yellow surface)
- 4) Big Man: 5U’5 (Big Man >YR>U’> Grey Fish >YR> Yellow surface)
- 5) Barbed Arrow: 56 (Flayed Arrow >YR> Yellow Fish >YU> Yellow surface)
- 6) Side Totem: 65 (Side Totem >YU> Grey Fish >YR> Yellow surface)
- 7) Big Totem: 6UU5 (Big Totem >YU>U>U> Grey Fish>YR> Yellow surface)
Now, it will take a bit of memorization to remember what algorithm to use with what case, so my suggestion is that if you don’t know, just do one of the two algorithms until you get one you do know.
The trick is to not only recognize and remember the specific case, but also to hold the cube correctly when you begin the algorithms. Of course, the orientation of the bottom two layers doesn’t matter at all as each algorithm will return the two layers the way they were before the algorithm.
When you’re done, the top layer will have a solid yellow face. Although there is a slight chance this step may solve the cube and you may not need the next two steps, you will likely need to move onto the next step, which is solving the yellow corners.
STEP 6) PERMUTE THE CORNERS (4 blocks solved)
GOAL: Solve the 4 yellow corners by rotating them.
You may only have 8 blocks to solve. It does happen every once in a while that you can skip this step because all the corners are already solved.
This step only has one algorithm to use, and there are not really any cases to memorize. Simply apply the algorithm over and over until the corners are solved.
- Algorithm 7: B’RF2 R’BRF2 R2 -Solve Yellow Corners (YC)
You are more likely to solve the corners if one of two situations exist. The first, and the most likely situation is if you can line up the colored faces of two of the corners with the front of the cube when you begin the algorithm. If you can match those two matching corner faces with the bottom two layers on the right, once solved, the corners will be arranged in the right place.
If you have no double matching corners, just start with one corner and try to line it up with the bottom two layers on the right. Then perform the algorithm. These two patterns seem to increase chances of the orientation and algorithm solving the corners.
When the four yellow corners are solved, your cube will look like this.
Sixteen down, four to go. On to the next step.
STEP 7) ORIENT THE EDGES (4 blocks solved)
GOAL: Solve the 4 yellow edges, and by so doing, complete solving the entire cube.
Now, you may even get lucky when you complete the previous step and find all the edges matched up, too. In that case, you’re done. Rejoice. Otherwise, the finish line is just around the corner. You will have either 3 or 4 edge blocks to solve. There is only one algorithm required to solve this step, but a second algorithm will save several moves, if necessary. One algorithm rotates the three edges facing the front counterclockwise and the other rotates them clockwise. If you look closely at these algorithms, they appear to be front to back and upside down opposites. This fact may help you when it comes time to memorize them.
- Algorithm 8: RU’RU RURU’ R’U’R2 – Rotate Yellow Edges Counterclockwise 🔄 (CC)
- Bonus Algorithm 5: R2UR UR’U’R’ U’R’UR’ – Rotate Yellow Edges Clockwise 🔁 (CW)
As a matter of strategy, there are basically 4 possible cases in this step.
- Clockwise rotation needed
- Counterclockwise rotation needed
- Swap opposite edges needed
- Swap adjacent edges needed
CLOCKWISE – If you find your cube with three edge blocks to be solved, and the solution lies in rotating the blocks in a clockwise rotation you can either use the clockwise rotation or use the counterclockwise rotation algorithm twice.
COUNTERCLOCKWISE – If you find the cube with three edge blocks to be solved, and the solution lies in rotating the unsolved blocks in the counterclockwise direction, simply use the counterclockwise rotation algorithm.
If you find your cube with all four edges needing solved, you will still solve it by rotating three blocks at a time either clockwise or counterclockwise. There are two ways the four edge blocks can be distributed: (1) the edges opposite need to be switched, or (2) the two sets of edges next to each other need to be switched.
All you’re going to need to solve these two scenarios is the counterclockwise rotation algorithm. Why the counterclockwise rotation algorithm? Either algorithm will do, actually. Either of these algorithms in either scenario will solve at most one edge. They both have the same number of moves, but the counterclockwise rotation is just a bit easier to perform. Then you’ll have three edges left. Simply reevaluate and solve accordingly with either the counterclockwise or clockwise algorithm.
OPPOSITE EDGES – If you find four edges opposite of each other need to be switched to solve the cube, start by using the counterclockwise rotation algorithm. The clockwise rotation algorithm will, of course, work as well. This will solve one of the edges (another down, 3 blocks to go). Then you need to reevaluate the block and either rotate the remaining 3 blocks clockwise or counterclockwise.
ADJACENT EDGES – If the edges you need to solve are adjacent to each other, the solution is the same. Simply perform the counterclockwise rotation algorithm and reevaluate the cube to solve the last 3 remaining blocks.
Twenty blocks solved!
You’re done. Congratulations. Take a moment to bask in the glory.
Now all you simply need to do is memorize the steps and algorithms and practice over and over until you can do it without assistance and amaze yourself, your family, and your friends.
Well done!
If you master this method and wish to increase your speed, I recommend beginning to learn the hundreds of algorithms you need for the speed cube methods. Good luck.
Practice
Now that you know the method, you simply need to practice. The best way to learn or commit the moves to memory is to do them over an over. This not only strengthens your mental memory, but builds muscle memory, which can save the day when your memory feels and your hands just instinctively do what they need to do. Muscle memory is also much faster.
To help you feel a sense of accomplishment as you progress, try keeping track of your progress as you (1) master the algorithms and (2) solve the cube. The handout has all the steps plus a place to track your progress.
You may have questions as you begin to apply the steps. To help you understand and learn to apply this method of solving the cube, I’ve prepared some practice sessions here.
First, we need a scrambled cube. And we’ll need the same scramble if we work on it together. It’s easy to just mess up the cube by performing random moves. You can also perform a set of moves randomly produced by a computer. So, we’ll both start with a solved cube, and perform the same scrambling moves to come up with the same scrambled cube to practice with.
There are many apps and programs you can use to scramble your cube. Here is one I used that is pretty easy to use and share. I’ve randomly used this site to generate a few scrambles below to practice together, so we both start with identical scrambled cubes.16 Practice scrambles 1-5 are just 10 moves (a double move like R2 is counted as one move here). This doesn’t scramble it much, but it’s simple and all we need for now.
You simply need to start with an unscrambled cube and make the following moves. Then we can unscramble it together. Of course, this won’t work if you have already scrambled your cube and can’t unscramble it. In that case, to get back to a solved cube you can either work your way through the seven-step method the best you can, or you can use an app or website like https://rubiks-cube-solver.com/ to give you the moves to solve it. Good luck.
Here are the practice scrambles:
- 1. D2 F2 L2 B2 F2 D2 U’ L’ R2 U (10 moves)
- 2. R’ D2 U R D’ B F D B2 U (10 moves)
- 3. L2 D’ R U L R B’ F2 D’ R (10 moves)
- 4. D’ B2 F U’ B F2 U’ F’ R2 B2 (10 moves)
- 5. D’ F R2 D2 L2 R’ D L’ R’ B’ (10 moves)
- 6. B F2 L R D2 F D’ U’ L2 R2 D’ U2 L2 R2 D’ U2 F L2 R’ B’ R F2 L D B’ F2 D’ U B2 F (30 moves)
- 7. B2 F2 D U2 L’ B2 F2 L2 F’ L2 R D U L D L2 U2 F2 L’ B’ F2 D R D’ U F2 L R’ D’ L’ R’ U’ B’ F2 L’ R2 U’ L2 R2 D B2 F2 R’ B F’ L R2 D’ L’ U2 (50 moves)
NOTE ON SCRAMBLE ORIENTATION: It’s important to note that you must hold an unscrambled cube in the proper orientation to begin with. In this scramble system, the center blocks will never move. So, make sure the center blocks match the orientation in the end scramble image below. In other words, start with white on the top, green on the front, orange on the left, etc.
NOTE ON OPTIMAL SOLVES: Plugging the first scramble (D2 F2 L2 B2 F2 D2 U’ L’ R2 U) into an online cube solver, shows the cube can be solved in 10 moves: U’ R2 L U D2 F2 B2 L2 F2 D2. You’ll notice that this is just front-to-back opposite moves from the scramble. If you use more than 20 moves, the optimum solution may begin to change from simply being the opposite moves as the optimum solution will almost always be 20 or less. That’s the God’s Number that we talked about before, that every cube can be optimally solved in 20 moves or less (if the program you use can figure it out, but it will always be around 20 or less).
Practice Scramble 1. D2 F2 L2 B2 F2 D2 U’ L’ R2 U
Start with a solved cube oriented with the White center block up and Green center block front, and perform the following 10 moves: D2 F2 L2 B2 F2 D2 U’ L’ R2 U.
Now, let’s solve it together using these seven steps.
- STEP 1 – Solve 4 White edge blocks
- Make the daisy
- ORIENT: Put Yellow center up and Orange center front
- Move White – Orange edge block to top: D F2
- Move White – Red edge block to top: D2 R2
- Match colored edge to colored center & flip
- ORIENT: Put Yellow center up and Orange center front
- White – Orange edge block is already matched, flip to bottom: F2
- White – Green edge block: U’ L2
- White – Red edge block: B2
- White – Blue edge block: U’ R2
- Make the daisy
- STEP 2 – Solve 4 white corner blocks and bottom layer
- White – Blue – Red corner block
- ORIENT: Put the Yellow center up and the Blue center front
- MOVE: U2 + R U2 R’ U’ R U R’ (Align block + BA3-TD)
- White – Blue – Orange corner block
- ORIENT: Put Yellow up, Orange front
- MOVE: U2 + U R U’ R’ (Align block + BA1-FD)
- White – Green – Orange corner block
- ORIENT: Put Yellow up, Green front
- MOVE: U + R U R’ (Align block + BA2-RD)
- White – Red – Green corner block
- ORIENT: Put Yellow up, Red front
- EXTRACT BLOCK: R U’ R’
- MOVE: URU’R’ (BA1-FD)
- Bottom layer solved.
- White – Blue – Red corner block
- STEP 3 – Solve 4 edge blocks and middle layer
- Green – Orange edge block
- ORIENT: Green center block front
- MOVE: U2 + R’U’R’U’R’URUR (Align block + A3-ER)
- Blue – Orange edge block
- ORIENT: Orange center block front
- MOVE: U + R’U’R’U’R’URUR (Align block + A3-ER)
- Blue – Red edge block
- ORIENT: Blue center block front
- MOVE: U + R’U’R’U’R’URUR (Align block + A3-ER)
- Red – Green edge block
- ORIENT: Red center block front
- MOVE: RU2R’U RU2R’U F’U’F (BA4-FE)
- Green – Orange edge block
- STEP 4 – Solve Yellow cross to set up for final level
- ORIENT: Blue center block front
- MOVE: FRU R’U’F’ (A4-YX)
- STEP 5 – Solve Yellow face to set up for solving final level
- Yellow Fish pattern recognized
- ORIENT: Orange center block front
- MOVE: U’RU’2R’ U’RU’R’ (A6-YU)
- STEP 6 – Solve Yellow Corners
- ORIENT: Orange center block front
- MOVE: RB’RF2 R’BRF2 R2 (A7-YC)
- STEP 7 – Solve Yellow Edges
- ORIENT: Blue center block front
- MOVE: RU’RU RURU’ R’U’R2 (A8-CC)
Conclusion
If you plug this scramble into a cube solver, it comes up with a less than 20-move solution.
- SCRAMBLE: D2 F2 L2 B2 F2 D2 U’ L’ R2 U (10 moves)
- OPTIMAL SOLUTION: U’ R2 L U D2 F2 B2 L2 F2 D2 (10 moves)
- METHOD MOVES: D F2 D2 R2 F2 U’ L2 B2 U’ R2 U2 R U2 R’ U’ R U R’ U2 U R U’ R’ U R U R’ R U’ R’ U R U’ R’ U2 R’ U’ R’ U’ R’ U R U R U R’ U’ R’ U’ R’ U R U R U R’ U’ R’ U’ R’ U R U R R U2 R’ U R U2 R’ U F’ U’ F F R U R’ U’ F’ U’ R U’2 R’ U’ R U’ R’ R B’ R F2 R’ B R F2 R2 R U’ R U R U R U’ R’ U’ R2 (109 moves – not including orientating moves)
Practice Scramble 2. R’ D2 U R D’ B F D B2 U
Start with a solved cube oriented with the White center block up and Green center block front, and perform the following 10 moves: R’ D2 U R D’ B F D B2 U.
Now, let’s solve it together using these seven steps.
- STEP 1 – Solve 4 White edge blocks
- Make the daisy
- ORIENT: Put Yellow center up and Orange center front
- Move White – Orange edge block to top: R’
- Move White – Blue edge block to top: F’
- Move White – Red edge block to top: L2
- For the last daisy petal, you can either rotate the top (U) layer, or the two bottom layers (d). We’ll turn the top.
- REORIENT: Put Yellow center up and Blue center front
- ROTATE TOP: U
- Move White – Green edge block to top: F’
- Match colored edge to colored center & flip
- ORIENT: Put Yellow center up and Orange center front
- White – Orange edge block: F2
- White – Red edge block: B2
- ROTATE TOP: U2
- White – Green edge block: R2
- White – Blue edge block: L2
- Make the daisy
- STEP 2 – Solve 4 white corner blocks and bottom layer
- White – Green – Orange corner block
- ORIENT: Put Yellow up, Green front
- MOVE: U’ + URU’R’ (Align block + BA1-FD)
- White – Blue – Orange corner block
- ORIENT: Put Yellow up, Orange front
- MOVE: U’ + RUR’ (Align block + BA2-RD)
- White – Red – Green corner block
- ORIENT: Put Yellow up, Red front
- MOVE: URU’R’ (BA1-FD)
- White – Blue – Red corner block
- ORIENT: Put Yellow up, Blue front
- UNSTUCK: RU’R’
- MOVE: URU’R’ (BA1-FD)
- First layer done.
- White – Green – Orange corner block
- STEP 3 – Solve 4 edge blocks and middle layer
- Blue – Orange edge block
- ORIENT: Orange center block front
- MOVE: URU’R’U’F’UF (A2-EF)
- Blue – Red edge block
- ORIENT: Blue center block front
- MOVE: URU’R’U’F’UF (A2-EF)
- Green – Orange edge block
- ORIENT: Green center block front
- MOVE: U’ + R’U’R’U’R’URUR (Align block + A3-ER)
- Red – Green edge block
- ORIENT: Red center block front
- MOVE: U’ + URU’R’U’F’UF (A2-EF)
- Second layer done.
- Blue – Orange edge block
- STEP 4 – Solve Yellow cross to set up for final level
- ORIENT: Orange center block front
- Angle pattern recognized
- MOVE: FRU R’U’F’ (A4-YX)
- Line pattern recognized (no reorientation needed)
- MOVE: FRU R’U’F’ (A4-YX)
- STEP 5 – Solve Yellow face to set up for solving final level
- Big Totem pattern recognized
- ORIENT: Green center block front
- MOVE: U’RU’2R’ U’RU’R’ (A6-YU)
- MOVE: U2
- MOVE: R’U2RUR’UR (A5-YR)
- STEP 6 – Solve Yellow Corners
- ORIENT: Orange center block front
- MOVE: RB’RF2 R’BRF2 R2 (A7-YC)
- STEP 7 – Solve Yellow Edges
- ORIENT: Red center block front
- MOVE: RU’RU RURU’ R’U’R2 (A8-CC)
- Cube solved!
Conclusion
If you plug this scramble into a cube solver, it comes up with a less than 20-move solution.
- SCRAMBLE: R’ D2 U R D’ B F D B2 U (10 moves)
- OPTIMAL SOLVE: U’ B2 D’ F B U L’ U2 D’ L’ U2 D’ L’ U B2 D F2 B2 U’ B2 D’ R2 (19 moves ) – not sure why the cube solver didn’t just reverse the 10 moves. Hmmm. Perhaps an example of the weakness of the cube solving program. I would think an optimal solve would be, U B2 D F B D’ R U D2 R’ (10 moves)
- METHOD MOVES: R’ F’ L2 U F’ F2 B2 U2 R2 L2 U U R U’ R’ U’ R U R’ U R U’ R’ R U’ R’ U R U’ R’ U R U’ R’ U’ F’ U F U R U’ R’ U’ F’ U F U’ R’ U’ R’ U’ R’ U R U R U’ U R U’ R’ U’ F’ U F F R U R’ U’ F’ F R U R’ U’ F’ U’ R U’2 R’ U’ R U’ R’ U2 R’ U2 R U R’ U R R B’ R F2 R’ B R F2 R2 R U’ R U R U R U’ R’ U’ R2 (111 moves – not including orientating moves)
Practice Scramble 3. L2 D’ R U L R B’ F2 D’ R
Start with a solved cube oriented with the White center block up and Green center block front, and perform the following 10 moves: L2 D’ R U L R B’ F2 D’ R.
Now, let’s solve it together using these seven steps.
- STEP 1 – Solve 4 White edge blocks
- Make the daisy
- ORIENT: Put Yellow center up and Blue center front
- Move White – Green edge block to top: R2
- Move White – Orange edge block to top: F
- Move White – Blue edge block to top: D’ L2
- Match colored edge to colored center & flip
- ORIENT: Leave Yellow center up and Blue center front
- White – Red edge block: U R2
- White – Orange edge block: L2
- White – Green edge block: U2 B2
- White – Blue edge block: F2
- Middle layer done.
- Make the daisy
- STEP 2 – Solve 4 white corner blocks and bottom layer
- White – Green – Orange corner block
- ORIENT: Put Yellow up, Green front
- MOVE: U’ + URU’R’ (Align block + BA1-FD)
- White – Red – Green corner block
- ORIENT: Put Yellow up, Red front
- MOVE: U + RU2R’U’RUR’ (Align block + BA3-TD)
- White – Blue – Red corner block
- ORIENT: Put Yellow up, Blue front
- MOVE: U’ +URU’R’ (Align block + BA1-FD)
- White – Blue – Orange corner block
- ORIENT: Put Yellow up, Orange front
- MOVE: U + RUR’ (Align block + BA2-RD)
- Bottom layer done.
- White – Green – Orange corner block
- STEP 3 – Solve 4 edge blocks and middle layer
- Red – Green edge block
- ORIENT: Red center block front
- MOVE: U’ + URU’R’U’F’UF (Align block + A2-EF)
- Green – Orange edge block
- ORIENT: Green center block front
- MOVE: R’U’R’U’R’URUR (A3-ER)
- Blue – Orange edge block
- ORIENT: Orange center block front
- MOVE: U’ + R’U’R’U’R’URUR (Align block + A3-ER)
- Blue – Red edge block
- ORIENT: Blue center block front
- MOVE: RU2R’U RU2R’U F’U’F (BA4-FE)
- Middle layer done.
- Red – Green edge block
- STEP 4 – Solve Yellow cross to set up for final level
- ORIENT: Blue center block front
- Angle pattern recognized
- MOVE: FRU R’U’F’ (A4-YX)
- Line pattern recognized (no reorientation needed)
- MOVE: FRU R’U’F’ (A4-YX)
- STEP 5 – Solve Yellow face to set up for solving final level
- Big Totem pattern recognized
- ORIENT: Orange center block front
- MOVE: U’RU’2R’ U’RU’R’ (A6-YU)
- MOVE: U2
- MOVE: R’U2RUR’UR (A5-YR)
- STEP 6 – Solve Yellow Corners
- ORIENT: Orange center block front
- Snake eyes pattern recognized with blue
- MOVE: U + RB’RF2 R’BRF2 R2 (Align blocks + A7-YC)
- Cube Solved!!!
- STEP 7 – Solve Yellow Edges
- Not needed.
- Cube solved.
Conclusion
If you plug this scramble into a cube solver, it comes up with a less than 20-move solution.
- SCRAMBLE: L2 D’ R U L R B’ F2 D’ R (10 moves)
- OPTIMAL SOLVE: R’ D F2 B R’ L’ U’ R’ D L2 (10 moves)
- METHOD MOVES: R2 F D’ L2 U R2 L2 U2 B2 F2 U’ U R U’ R’ U R U2 R’ U’ R U R’ U’ U R U’ R’ U R U R’ U’ U R U’ R’ U’ F’ U F R’ U’ R’ U’ R’ U R U R U’ R’ U’ R’ U’ R’ U R U R R U2 R’ U R U2 R’ U F’ U’ F F R U R’ U’ F’ F R U R’ U’ F’ U’ R U’2 R’ U’ R U’ R’ U2 R’ U2 R U R’ U R U R B’ R F2 R’ B R F2 R2 (109 moves – not including orientating moves)
Practice Scramble 4. D’ B2 F U’ B F2 U’ F’ R2 B2
Start with a solved cube oriented with the White center block up and Green center block front, and perform the following 10 moves: D’ B2 F U’ B F2 U’ F’ R2 B2.
Now, let’s solve it together using these seven steps.
- STEP 1 – Solve 4 White edge blocks
- Make the daisy
- ORIENT: Put Yellow center up and Red center front
- Move White – Blue edge block to top: U + R
- Move White – Red edge block to top: L’
- Move White – Orange edge block to top: U’ + L2
- Match colored edge to colored center & flip
- SAME ORIENTATION: Put Yellow center up and Red center front
- White – Green edge block: R2
- White – Red edge block: F2
- White – Orange edge block: U B2
- White – Blue edge block: U2 L2
- Bottom layer done.
- Make the daisy
- STEP 2 – Solve 4 white corner blocks and bottom layer
- White – Green – Orange corner block
- ORIENT: Put Yellow up, Green front
- MOVE: RUR’ (BA2-RD)
- White – Blue – Red corner block
- ORIENT: Put Yellow up, Blue front
- MOVE: U + URU’R’ (Align block + BA1-FD)
- White – Red – Green corner block
- ORIENT: Put Yellow up, Red front
- MOVE: U’ + RU2R’U’RUR’ (Align block + BA3-TD)
- White – Blue – Orange corner block
- ORIENT: Put Yellow up, Orange front
- MOVE: URU’R’ (BA1-FD)
- White – Green – Orange corner block
- STEP 3 – Solve 4 edge blocks and middle layer
- Blue – Orange edge block
- ORIENT: Orange center block front
- MOVE: R’U’R’U’R’URUR (A3-ER)
- Red – Green edge block
- ORIENT: Red center block front
- MOVE: R’U’R’U’R’URUR (A3-ER)
- Green – Orange edge block
- ORIENT: Green center block front
- MOVE: RU2R’U RU2R’U F’U’F (A4-FE)
- Blue – Red edge block
- Solved.
- Middle layer done.
- Blue – Orange edge block
- STEP 4 – Solve Yellow cross to set up for final level
- Angle pattern recognized
- ORIENT: Orange center block front
- MOVE: FRU R’U’F’ (A4-YX)
- Line pattern recognized
- MOVE: FRU R’U’F’ (A4-YX)
- STEP 5 – Solve Yellow face to set up for solving final level
- Yellow Fish pattern recognized
- ORIENT: Orange center block front
- MOVE: U’RU’2R’ U’RU’R’ (A6-YU)
- STEP 6 – Solve Yellow Corners
- ORIENT: Red center block front
- MOVE: U2 + RB’RF2 R’BRF2 R2 (A7-YC)
- STEP 7 – Solve Yellow Edges
- SAME ORIENTATION: Red center block front
- MOVE: RU’RU RURU’ R’U’R2 (A8-CC)
- Done with this cube. Solved. Hurrah!
Conclusion
If you plug this scramble into a cube solver, it comes up with a less than 20-move solution.
- SCRAMBLE: D’ B2 F U’ B F2 U’ F’ R2 B2 (10 moves)
- OPTIMAL SOLVE: F2 L2 F D F2 B’ D F’ U2 F2 R2 F2 B2 U2 F2 D2 R2 D (18 moves) or just perform the scramble moves in reverse.
- METHOD MOVES: U R L’ U’ L2 R2 F2 U B2 U2 L2 R U R’ U U R U’ R’ U’ R U2 R’ U’ R U R’ U R U’ R’ R’ U’ R’ U’ R’ U R U R R’ U’ R’ U’ R’ U R U R R U2 R’ U R U2 R’ U F’ U’ F F R U R’ U’ F’ F R U R’ U’ F’ U’ R U’2 R’ U’ R U’ R’ U2 R B’ R F2 R’ B R F2 R2 R U’ R U R U R U’ R’ U’ R2 (102 moves – not including orientating moves)
Practice Scramble 5. D’ F R2 D2 L2 R’ D L’ R’ B’
Start with a solved cube oriented with the White center block up and Green center block front, and perform the following 10 moves: D’ F R2 D2 L2 R’ D L’ R’ B’.
Now, let’s solve it together using these seven steps.
- STEP 1 – Solve 4 White edge blocks
- Make the daisy
- ORIENT: Put Yellow center up and Red center front
- Move White – Orange edge block to top: U
- Move White – Green edge block to top: R
- Move White – Blue edge block to top: L’
- Move White – Red edge block to top: U2 F
- Match colored edge to colored center & flip
- SAME ORIENTATION: Put Yellow center up and Red center front
- White – Orange edge block: B2
- White – Red edge block: F2
- White – Green edge block: U2 R2
- White – Blue edge block: L2
- Make the daisy
- STEP 2 – Solve 4 white corner blocks and bottom layer
- White – Green – Orange corner block
- ORIENT: Put Yellow up, Green front
- MOVE: RUR’ (BA2-RD)
- White – Blue – Red corner block
- ORIENT: Put Yellow up, Blue front
- MOVE: U2 + RUR’ (Align block + BA2-RD)
- White – Blue – Orange corner block
- ORIENT: Put Yellow up, Orange front
- MOVE: U’ + URU’R’ (Align block + BA1-FD)
- White – Red – Green corner block
- Already solved.
- White – Green – Orange corner block
- STEP 3 – Solve 4 edge blocks and middle layer
- Green – Orange edge block
- ORIENT: Green center block front
- MOVE: U’ + R’U’R’U’R’URUR (Align block + A3-ER)
- Blue – Red edge block
- ORIENT: Blue center block front
- MOVE: R’U’R’U’R’URUR (A3-ER)
- Blue – Orange edge block
- ORIENT: Orange center block front
- MOVE: URU’R’U’F’UF (A2-EF)
- Red – Green edge block
- ORIENT: Red center block front
- MOVE: U’ + URU’R’U’F’UF (A2-EF)
- Middle layer done.
- Green – Orange edge block
- STEP 4 – Solve Yellow cross to set up for final level
- ORIENT: Blue center block front
- MOVE: FRU R’U’F’ (A4-YX)
- STEP 5 – Solve Yellow face to set up for solving final level
- Grey Fish pattern recognized
- ORIENT: Green center block front
- MOVE: R’U2RUR’UR (A5-YR)
- STEP 6 – Solve Yellow Corners
- ORIENT: Orange center block front
- MOVE: U2 (Align Blocks)
- STEP 7 – Solve Yellow Edges
- ORIENT: Orange center block front
- MOVE: RU’RU RURU’ R’U’R2 (A8-CC)
- The cube is done. Solved. Finished.
Conclusion
If you plug this scramble into a cube solver, it comes up with a less than 20-move solution.
- SCRAMBLE: D’ F R2 D2 L2 R’ D L’ R’ B’ (10 moves)
- OPTIMAL SOLVE: B R L D’ R’ U2 R2 B U2 F2 D F2 R2 L2 B2 U B2 D’ (18 moves)
- METHOD MOVES: U R L’ U2 F B2 F2 U2 R2 L2 R U R’ U2 R U R’ U’ U R U’ R’ U’ R’ U’ R’ U’ R’ U R U R R’ U’ R’ U’ R’ U R U R U R U’ R’ U’ F’ U F U’ U R U’ R’ U’ F’ U F F R U R’ U’ F’ R’ U2 R U R’ U R U2 R U’ R U R U R U’ R’ U’ R2 (83 moves – not including orientating moves)
Practice Scramble 6. B F2 L R D2 F D’ U’ L2 R2 D’ U2 L2 R2 D’ U2 F L2 R’ B’ R F2 L D B’ F2 D’ U B2 F
Start with a solved cube oriented with the White center block up and Green center block front, and perform the following 30 moves: B F2 L R D2 F D’ U’ L2 R2 D’ U2 L2 R2 D’ U2 F L2 R’ B’ R F2 L D B’ F2 D’ U B2 F.
Now, let’s solve it together using these seven steps.
- STEP 1 – Solve 4 White edge blocks
- Make the daisy
- ORIENT: Put Yellow center up and Blue center front
- Move White – Red edge block to top: R’ F’
- Move White – Green edge block to top: L’
- Move White – Blue edge block to top: U2 L’
- Move White – Orange – solved already
- Match colored edge to colored center & flip
- SAME ORIENTATION: Put Yellow center up and Blue center front
- White – Orange edge block: U L2
- White – Red edge block: R2
- White – Green edge block: U2 B2
- White – Blue edge block: F2
- Make the daisy
- STEP 2 – Solve 4 white corner blocks and bottom layer
- White – Red – Green corner block
- ORIENT: Put Yellow up, Red front
- MOVE: U’ + URU’R’ (Align block + BA1-FD)
- White – Blue – Red corner block
- ORIENT: Put Yellow up, Blue front
- MOVE: U’ + RUR’ (Align block + BA2-RD)
- White – Blue – Orange corner block
- ORIENT: Put Yellow up, Orange front
- MOVE: U + RU2R’U’RUR’ (Align block + BA3-TD)
- White – Green – Orange corner block
- ORIENT: Put Yellow up, Green front
- MOVE: RU2R’U’RUR’ (BA3-TD)
- Bottom layer finished.
- White – Red – Green corner block
- STEP 3 – Solve 4 edge blocks and middle layer
- Red – Green edge block
- ORIENT: Red center block front
- MOVE: R’U’R’U’R’URUR (A3-ER)
- Blue – Red edge block
- ORIENT: Blue center block front
- MOVE: U2 + URU’R’U’F’UF (Align block + A2-EF)
- Blue – Orange edge block
- ORIENT: Green center block front
- UNSTUCK: R’U’R’U’R’URUR (A3-ER)
- ORIENT: Orange center block front
- MOVE: U + R’U’R’U’R’URUR (Align block + A3-ER)
- Green – Orange edge block
- ORIENT: Green center block front
- MOVE: U’ + R’U’R’U’R’URUR (Align block + A3-ER)
- Done with the middle layer.
- Red – Green edge block
- STEP 4 – Solve Yellow cross to set up for final level
- Line pattern recognized
- ORIENT: Green center block front
- MOVE: FRU R’U’F’ (A4-YX)
- STEP 5 – Solve Yellow face to set up for solving final level
- Big Totem pattern recognized
- ORIENT: Red center block front
- MOVE: U’RU’2R’ U’RU’R’ (A6-YU)
- MOVE: U2
- MOVE: R’U2RUR’UR (A5-YR)
- STEP 6 – Solve Yellow Corners
- Done already.
- STEP 7 – Solve Yellow Edges
- ORIENT: Orange center block front
- MOVE: R2UR UR’U’R’ U’R’UR’ (BA5-CW)
- Solved. Yippee!
Conclusion
If you plug this scramble into a cube solver, it comes up with a 20-move solution.
- SCRAMBLE: B F2 L R D2 F D’ U’ L2 R2 D’ U2 L2 R2 D’ U2 F L2 R’ B’ R F2 L D B’ F2 D’ U B2 F(30 moves)
- OPTIMAL SOLVE: R’ D’ B’ R F’ L2 U2 F2 L’ D’ L’ F’ L2 U B2 L2 B2 U R2 D (20 moves)
- METHOD MOVES: R’ F’ L’ U2 L’ U L2 R2 U2 B2 F2 U’ U R U’ R’ U’ R U R’ U R U2 R’ U’ R U R’ R U2 R’ U’ R U R’ R’ U’ R’ U’ R’ U R U R U2 U R U’ R’ U’ F’ U F R’ U’ R’ U’ R’ U R U R U R’ U’ R’ U’ R’ U R U R U’ R’ U’ R’ U’ R’ U R U R F R U R’ U’ F’ U’ R U’2 R’ U’ R U’ R’ U2 R’ U2 R U R’ U R R2 U R U R’ U’ R’ U’ R’ U R’ (115 moves – not including orientating moves)
Practice Scramble 7. B2 F2 D U2 L’ B2 F2 L2 F’ L2 R D U L D L2 U2 F2 L’ B’ F2 D R D’ U F2 L R’ D’ L’ R’ U’ B’ F2 L’ R2 U’ L2 R2 D B2 F2 R’ B F’ L R2 D’ L’ U2
Start with a solved cube oriented with the White center block up and Green center block front, and perform the following 50 moves: B2 F2 D U2 L’ B2 F2 L2 F’ L2 R D U L D L2 U2 F2 L’ B’ F2 D R D’ U F2 L R’ D’ L’ R’ U’ B’ F2 L’ R2 U’ L2 R2 D B2 F2 R’ B F’ L R2 D’ L’ U2.
Now, let’s solve it together using these seven steps.
- STEP 1 – Solve 4 White edge blocks
- Make the daisy
- ORIENT: Put Yellow center up and Red center front
- Move White – Red edge block to top: L’
- Move White – Blue edge block to top: R’ F’
- Move White – Green edge block to top: D’ R2
- Move White – Orange edge block to top already solved.
- Match colored edge to colored center & flip
- SAME ORIENTATION: Put Yellow center up and Red center front
- White – Orange edge block: B2
- White – Green edge block: R2
- White – Red edge block: U’ F2
- White – Blue edge block: U2 L2
- Make the daisy
- STEP 2 – Solve 4 white corner blocks and bottom layer
- White – Green – Orange corner block
- ORIENT: Put Yellow up, Green front
- MOVE: U’ + RUR’ (Align block + BA2-RD)
- White – Blue – Orange corner block
- ORIENT: Put Yellow up, Orange front
- MOVE: U’ + RU2R’U’RUR’ (Align block + BA3-TD)
- White – Red – Green corner block
- ORIENT: Put Yellow up, Blue front
- UNSTUCK: RU’R’
- REORIENT: Put Yellow up, Red front
- MOVE: U’ + URU’R’ (Align block + BA1-FD)
- White – Blue – Red corner block
- ORIENT: Put Yellow up, Blue front
- MOVE: U + RU2R’U’RUR’ (Align block + BA3-TD)
- Bottom layer solved!
- White – Green – Orange corner block
- STEP 3 – Solve 4 edge blocks and middle layer
- Blue – Orange edge block
- ORIENT: Orange center block front
- MOVE: U + URU’R’U’F’UF (Align block + A2-EF)
- Blue – Red edge block
- ORIENT: Blue center block front
- MOVE: U + R’U’R’U’R’URUR (Align block + A3-ER)
- Green – Orange edge block
- ORIENT: Green center block front
- MOVE: U + URU’R’U’F’UF (Align block + A2-EF)
- Red – Green edge block
- ORIENT: Red center block front
- MOVE: RU2R’U RU2R’U F’U’F (BA4-FE)
- Middle layer done.
- Blue – Orange edge block
- STEP 4 – Solve Yellow cross to set up for final level
- Line pattern recognized
- ORIENT: Blue center block front
- MOVE: FRU R’U’F’ (A4-YX)
- STEP 5 – Solve Yellow face to set up for solving final level
- Atlas pattern recognized
- ORIENT: Blue center block front
- MOVE: R’U2RUR’UR (A5-YR)
- MOVE: R’U2RUR’UR (A5-YR)
- STEP 6 – Solve Yellow Corners
- ORIENT: Orange center block front
- MOVE: RB’RF2 R’BRF2 R2 (A7-YC)
- Red Snake Eyes pattern recognized
- ORIENT: Blue center block front
- MOVE: U2 + RB’RF2 R’BRF2 R2 (A7-YC)
- STEP 7 – Solve Yellow Edges
- ORIENT: Blue center block front
- MOVE: RU’RU RURU’ R’U’R2 (A8-CC)
- ORIENT: Green center block front
- MOVE: R2UR UR’U’R’ U’R’UR’ (A9-CW)
- The entire cube is solved!
Conclusion
If you plug this scramble into a cube solver, it comes up with a 20-move solution.
- SCRAMBLE: B2 F2 D U2 L’ B2 F2 L2 F’ L2 R D U L D L2 U2 F2 L’ B’ F2 D R D’ U F2 L R’ D’ L’ R’ U’ B’ F2 L’ R2 U’ L2 R2 D B2 F2 R’ B F’ L R2 D’ L’ U2 (50 moves)
- OPTIMAL SOLVE: R2 U’ B2 L’ D’ F’ U R2 B L’ D’ F2 L’ Us B2 U F2 B2 U’ F2 (20 moves)
- METHOD MOVES: L’ R’ F’ D’ R2 B2 R2 U’ F2 U2 L2 U’ R U R’ U’ R U2 R’ U’ R U R’ R U’ R’ U’ U R U’ R’ U R U2 R’ U’ R U R’ U U R U’ R’ U’ F’ U F U R’ U’ R’ U’ R’ U R U R U U R U’ R’ U’ F’ U F R U2 R’ U R U2 R’ U F’ U’ F F R U R’ U’ F’ R’ U2 R U R’ U R R’ U2 R U R’ U R R B’ R F2 R’ B R F2 R2 U2 R B’ R F2 R’ B R F2 R2 R U’ R U R U R U’ R’ U’ R2 R2 U R U R’ U’ R’ U’ R’ U R’ (139 moves – not including orientating moves)
Mnemonic Devices (to help you memorize)
Here are a few handy mnemonic devices. A mnemonic device is any learning technique that uses imagery as tools that help you retain and recall memorized information.[1] You can use these mnemonic devices or create your own.
I also try to use the monosyllabic pronounceable names for the moves I mentioned above. Monosyllabic because you can rhythmically perform the move as you recall the steps. I use pronounceable names, so I can place them in a more memorable storyline.
Here are my move names:
| Side | Clockwise (N) | Counterclockwise (N‘) | Double (N2) |
| U-upper | You | Ute | You’d |
| R-right | Are | Art | Arred |
| F-front | Eff | Fart | Fard |
| B-back | Bee | Bert | Bard |
| L-left | Elle | ‘Elt | Lard |
| D-down | Dee | Dirt | Dard |
Now, I’ve got to warn you. These phrases talk a lot about Ute Indians, art, farts, and guys named Art, Bert, Fard, and Eff. And the story is a little weird, which, I hope, will make it more memorable.
Here’s the context: you’re at an art gallery with your 4 friends:
- Art,
- Bert,
- Fard, and
The art currently on display is American Indian art from the Ute tribe. And the funny thing is you’re a little tongue tied, so your words come out all jumbled. And that’s not all, you’re really obsessed with the artist of the Ute art, whose name happens to also be Ute. And, also your friend, Eff ate a lot of beans that morning, so he’s a bit gassy. He’s got a letter F on his forehead. Also, you’re a pirate.
Now, let’s go to the museum.
Remembering the Bottom Layer
BOTTOM LAYER
You approach the doors of the museum in the morning.. You notice that the sun (the center yellow block) is up. In fact, it’s right above the museum. Hold the cube with the center yellow block up.
Remembering Step 1
STEP 1) THE WHITE EDGES (solve 4 edge blocks)
As you walk to the building’s entrance, the first thing you notice is that the steps have white edges (Interpretation: you start by solving the white edge blocks). Surrounding the front of the building, are hundreds of daisies with yellow centers and white petals.
MAKE THE WHITE & YELLOW DAISY:
To get in the door, you find the white petals (white edge blocks) and attach them to the yellow center (yellow center block) by twisting them up.
FLIP THE PETALS:
Once you have the daisy completed, you use it as a key to unlock the door to the museum. You put the daisy into the keyhole and match the petals to the color on the side and twist them to the white side.
The door unlocks and you walk into the lobby.
Remembering Step 2
STEP 2) THE WHITE CORNERS (solve 4 corner blocks)
You enter the lobby, a square room with four white corner blocks in the corners and a Rubik’s cube in the center of the room. There is also a sign in the lobby announcing the name of the current exhibit: Ute Art.
You are waiting for your four friends: Art, Bert, Fard, and Eff. You see four guys standing at the top of each corner of the cube in the center of the room.
There are basically four things that can happen when you talk to each guy at the top of the cube:
- You’re not sure who you see, (algorithm 1-All Drop)
- You see the front of their face, (bonus algorithm 1-Front Drop)
- Their face on the right, or (bonus algorithm 2-Right Drop)
- They are staring up at the ceiling. (bonus algorithm 3-Top Drop)
Remembering Algorithm 1 – All Drop
Are you…? Art Ute?
Algorithm 1-All Drop (A1-AD-RUR’U’) helps you move any white corner block positioned on the top of the front/right edge from the top layer to the bottom layer in the correct position. Use this algorithm first or if you can’t remember the other algorithms in this step. It should be the first you memorize, and you can use it alone to solve the first step, although it would require more steps. Repeating this algorithm eventually drops any white corner (front, right, or top oriented) to the bottom corner.
So, you’re looking up at three people, who might be your friends, standing on top of the cube in the middle of the room, but you can’t tell if they are here for the Ute art exhibit aptly called Ute Art.
So, while pointing to the sign you ask them, “Are you… Art Ute?” Meaning, of course, “Excuse me, are you here for the Ute Art exhibit?”
You ask this over and over until they come down under the block where they are supposed to be, and you can see their faces clearly. And sure enough, they are your friends, and they’re in the right place.
Remembering Bonus Algorithm 1 – Front Drop
You are Ute art.
Bonus Algorithm 1 – Front Drop (BA1-FD-URU’R’) moves a white corner block positioned on the top of the front/right edge with the white edge facing frontward from the top layer to the bottom in the correct position.
Alternatively, if while you’re looking at the people on the top of the block, the person on the top of the block has a white face looking forward, you recognize them. They move to stand on the corner above the two center blocks that match the two other colors on their block. (Meaning, you move the block above the space you want to drop it to). You call out to them, “You are Ute art.” This, of course means, “You are here for the Ute art exhibit, yeah?”
As you say this, they come down to the spot they are meant to be in.
Remembering Bonus Algorithm 2 – Right Drop
Are you art?
Bonus Algorithm 2 – Right Drop (BA2-RD-RUR’) moves a white corner block, positioned on the top of the front/right edge with the white edge facing to the right face, from the top layer to the bottom layer in the correct position.
Alternatively, if the white corner block on the top has a white face facing the right, they move above the two center blocks matching the two other faces of their block.
Not quite sure who he is because his face is not facing forward, you tentatively ask, “Are you…art?” By which you mean, “Are you here for the …art?”
Remembering Bonus Algorithm 3 – Top Drop
Are you’d art Ute? Are you art?
Bonus Algorithm 3 – Top Drop (BA3-TD-RU2R’U’RUR’) moves a white corner block, positioned on the top of the front/right edge with the white edge facing up, from the top layer to the bottom layer in the correct position.
Then there’s the guy who, standing on the block is just staring up at the ceiling. As you find him, he moves above the two center blocks that match the two colors on the two other faces of his block. Of course, you can’t see his face. You’re not sure, but you think this might be the famous artist who painted all the art in the Ute art exhibit. His name is also Ute.
You shout up to him, “Are you’d art, Ute? Are you art?” What you really mean is, “Are you the artist Ute? Are you the one who did this art?”
Remembering the Middle Layer
MIDDLE LAYER (8 blocks – 4 already solved)
After getting all your friends down to where they need to be, you all head into the middle layer or second floor of the museum where the art is on display.
Remembering Step 3
STEP 3) MIDDLE EDGES (solve 4 edge blocks)
Here on the second floor, there are 4 paintings in the right place and up to 4 that may need to be changed. You and your friends spot someone on the third floor moving the second-floor paintings into place from above.
There are basically three ways these paintings are moved:
- The painting is on the right wall of the third floor and needs to be moved to the corner of the second floor,
- The painting is on the front wall of the third floor and needs to be moved to the corner of the second-floor walls, or
- The painting is on the second-floor wall corner but is upside down or left to right and needs to be rotated.
Alternatively, sometimes the painting is stuck in the wrong place on the second floor and needs to be lifted out up to the third floor to be relocated.
Remembering Algorithm 2 – Edge Left
You are Ute art, Ute! Fart. You Eff?
Algorithm 2 – Edge Front (A2-EF-URU’R’U’F’UF) moves a colored edge block with the block on the front/up edge and the center front color adjacent to the matching color on the edge block. This algorithm moves this block from the top layer to the middle layer on the front/right edge.
You’re now on the second or middle floor of the museum (and the middle layer of the cube). You and your friends are looking up to a painting on the front of the third floor. This painting moves so it matches the color of the painting directly under it on the second floor. But the employee there, one of the painters, named Ute needs to bring the top painting down to the second floor in the middle of the front and right walls.
The painting is on the front wall right now, but from your standpoint, it looks like the painting is on the edge front.
You look up at Ute, as he’s moving this painting down, and you want to say to him, “Are you the artist that created all this Ute art, Ute?” But just as you say it, your friend, Eff farts. So, when you go to speak to Ute, you actually say, “You are Ute art, Ute!” [Fart]. “You Eff?” because you turned around at that moment and pointed to Eff’s F on his forehead and asked him “Eff, was it you that farted?”
Remembering Algorithm 3 – Edge Right
Art Ute… Art Ute art? You are! You are!
Algorithm 3 – Edge Right (A3-ER-R’U’R’U’R’URUR) moves a colored edge block with the block on the right/up edge and the center right color adjacent to the matching color on the edge block. This algorithm moves this block from the top layer to the middle layer on the front/right edge.
What could happen instead when you get to the second level of the library (or the cube) is you find Ute, the artist, with a painting on the third level on the edge to your right. The painting moves so the color of the edge right painting is the same color as the painting under it on the second floor – if it’s not already there. But this top painting is in the wrong place, so Ute is moving it down to the second level.
You want to ask him, “Hey, Artist Ute, are you the artist who painted this Ute art?” But, you’re so nervous talking to him, you say instead, “Art Ute… Art Ute art? You are! You are!” because you’re so excited to confirm it’s actually him. As halfway down, you read his name on his name badge.
Remembering Bonus Algorithm 4 – Flip Edge
Are you’d art, you? Are you’d art, you? Fart Ute, Eff.
Bonus Algorithm 4 (BA4-FE-RU2R’U RU2R’U F’U’F) helps you flip a colored edge block on the middle layer on the front/right edge to face the other direction and match the front and right center blocks.
Lastly, you notice one of the second-floor paintings is in the right place, but upside down.
You point to the upside-down painting and shout out to Ute, “Are you’d art, you? Are you’d art, you? Fart Ute, Eff.” What you mean is, “Are you da artist, you there? Are you the artist, you there? Fart on Ute, Eff.” You’re not sure why you ask Eff to fart on Ute, maybe to get his attention or to help him flip the painting upside down.
Remembering the Top Layer
TOP LAYER (9 blocks – 1 already solved)
When all the paintings on the second floor are fixed, you tell your friends to follow you up to the third floor or the top level, so you can meet Ute in person.
Remembering Step 4
STEP 4) A YELLOW CROSS (nothing solved)
As you’re running up the staircase, you pull out your camera, not to shoot Ute, but to get him in your crosshairs (think yellow cross).
Remembering Algorithm 4 – Yellow Cross
Eff, are you art Ute, fart?
Algorithm 4 – Yellow Cross (A4-YX-FRU R’U’F’) rotates the yellow edge blocks to eventually end up in a yellow cross pattern on the upper face of the cube. This step doesn’t solve any blocks but sets up the cube for the algorithms in the final two steps.
As you and your friends approach the third floor, you search for Ute. You use the scope on your camera to help you spot him.
YX or “Yex” is what you say when you line up the yellow crosshair on your target. You line up the parts of the crosshairs you have then shout to your friend Eff, “Eff, are you art Ute, fart?” What you’re trying to say is, “Hey, Eff, are you seeing the artist Ute? If so, then fart, so I know.”
CASE 1) LINE
If you have only a line in your crosshairs, position the line from the left wall to the right wall, then shout out to Eff.
CASE 2) ANGLE
If you only have an angle in your crosshairs, position the angle away from you (against the left and back walls). Away from you because you don’t want to take a picture of yourself, and the angle represents the possible camera range.
CASE 3) DOT
If all you have is a dot in the middle of the crossfire, you don’t really have anything at all, so it doesn’t matter how you hold the cube. Just perform the moves until you get an angel or line. Shout out to Eff.
Remembering Step 5
STEP 5) YELLOW TOP SURFACE (nothing solved)
Step 5 is about getting all the top surface yellow. Imagine arriving on the top level with your friends and seeing the yellow tiled floor. When all the tiles on the floor are yellow, then you can step onto the third floor and solve the last two steps to solve the cube. Once the cube is solved, your trip through the museum is complete.
You and your friends are confronted by either Yar, the pirate, or Uncle Sam.
Remembering Algorithm 5 – Yellow Right
Art, you’d… Are you Art? You are!
Algorithm 5 – Yellow Right (A5-YR-R’U2RUR’UR) permutes (rotates) the yellow corner blocks between seven patterns clockwise (u) to eventually end up with a complete yellow surface. This step doesn’t solve any blocks but sets up the cube for the algorithms in the final two steps.
As you look out over the surface of the third floor, you may see a guy that looks like a pirate, who says, “Yaarrr” or ”YR”. He likes grey fish (there’s a grey fish pinned to his pirate uniform). He’s a man like Atlas holding something big above his head or a big man with his arms out. Also, he shoots barbed arrows. In fact, he has some the front of the arrows, the tips, in his hands. And the man always follows Uncle Sam on the totem.
If you confront the pirate, you must shout out to him, “Art, you’d… Are you Art? You are!” By which, you mean, “Hey, Artist, you’d better…. Are you an artist? Haha, You are!” And you slap him with his grey fish – often the last move when dealing with him.
Remembering Algorithm 6 – Yellow Up
Ute are Ute’d art. Ute are Ute art.
Algorithm 6 – Yellow Up (A6-YU-U’RU’2R’ U’RU’R’) permutes (rotates) the yellow corner blocks between seven patterns counterclockwise (U’) to eventually end up with a yellow surface. This step doesn’t solve any blocks but sets up the cube for the algorithms in the final two steps.
As you look out on the yellow surface, you may see Uncle Sam pointing at you saying, “You!” or YU. He has a big yellow fish pinned to the front of his jacket. He also shoots barbed arrows, but not first. There are several feathered ends of arrows in his hands. When there is a totem in the room (whether standing or on its side), you always see him first on the totem before the pirate. He also has an Indian feathered hat.
If you confront Uncle Sam, you suspect he is actually Ute, the artist you are tracking down, so you must shout out to him, “Ute are Ute’d art. Ute are Ute art.” By which, you mean, “Ute, you are Ute’d” – like you’re telling him it’s clear by the feathers in his cap, that he’s really a Ute Indian. “Ute, you are the Ute artist!”
Remembering 7 Yellow Surface Patterns (Cases)
THE 7 YELLOW SURFACE CASES
So, as you and your friends approach the surface of the third floor, and before you can step onto it, you see one of seven things. You need to address them in turn and turn the floor surface all yellow before you step out onto it.
CASE 1) GREY FISH: YR
You may see a grey fish. In that case, you merely shout out to the pirate, “Art, you’d… Are you Art? You are!” By which, you mean, “Hey, Artist, you’d better…. Are you an artist? Haha, You are!” And then you slap him with his grey fish. Done. The floor surface should be yellow.
CASE 2) YELLOW FISH: YU
You may see a yellow fish. The fish would most likely be on the jacket of Uncle Sam. Or is it Ute, the Ute artist, posing as Uncle Sam. You must shout out to him, “Ute are Ute’d art. Ute are Ute art.” By which, you mean, “Ute, you are Ute’d” – like you’re telling him it’s clear by the feathers in his cap, that he’s really a Ute Indian. “Ute, you are the Ute artist!”
CASE 3) ATLAS: YR-(Grey Fish)-YR
You may see Yar, the pirate, holding a huge grey fish above his head like Atlas holding up the world on his shoulders. If this is the case, you’re going to shout at him twice, “Art, you’d… Are you Art? You are!” After the first time, the pirate turns into a grey fish. The second shout deals with him just like you would with the grey fish.
CASE 4) BIG MAN: YR-U’-(Grey Fish)-YR
You may see Yar, the pirate, standing with his arms out, flexing like a strong man.
If you see this, you shout, “Art, you’d… Are you Art? You are!” Then shout out, “Ute,” to make sure he doesn’t interfere. The pirate turns into a grey fish. And to finish off the pirate’s grey fish, you shout, “Art, you’d… Are you Art? You are!” one last time.
CASE 5) BARBED ARROW: YR-(Yellow Fish)-YU
You may just see the tip of a barbed arrow when you look out over the third floor. This is the pirate, so you shout, “Art, you’d… Are you Art? You are!” He turns into a yellow fish, and you must shout, “Ute are Ute’d art. Ute are Ute art.” He disappears and the surface of the floor turns yellow.
CASE 6) SIDE TOTEM: YU-(Grey Fish)-YR
You may see a totem pole laying on its side when you look out over the third floor. Uncle Sam is on the totem pole, so you must shout out, “Ute are Ute’d art. Ute are Ute art.” After which he turns into a grey fish, so you shout, “Art, you’d… Are you Art? You are!” Are he disappears and the floor surface runs solid yellow.
CASE 7) BIG TOTEM: YU-U2-(Grey Fish)-YR
You may spot a big totem pole standing up straight. Of course, Uncle Sam is on the totem pole. So, you shout, “Ute are Ute’d art. Ute are Ute art.” He turns into a grey fish, but this grey fish is upside down, having fallen from the top of the totem pole. So, you must shout, “You’d,” as in “You’d better turn around!” The grey fish turns around and you shout, “Art, you’d… Are you Art? You are!” It disappears and the surface of the floor turns solid yellow.
Done. Well, at least with step 5. You step out onto the yellow surface and into step 6.
Remembering Step 6
STEP 6) PERMUTE YELLOW CORNERS (4 blocks solved)
Here
Remembering Algorithm 7 – Yellow Corners
Are Bert are Fard? Art bee are Fard. Arred?
Algorithm 7 – Yellow Corners (A7-YC-RB’RF2 R’BRF2 R2) solves the yellow corner blocks by permuting them through patterns. You increase your chances by starting the moves by matching two matching color faces of yellow corner blocks on the front side with the color of the center block on the right side (the snake eyes pattern) or at the very least the front face of the yellow corner block at the top of the front/right edge with the right center block (padiddle).
You emerge onto the yellow surface of the third floor to see that the four corners need to be aligned. Your friends, Bert, Fard, Eff, and Art are following close behind you. Eff and Art are next to you, but as you look at Bert and Fard, you can’t tell them apart. There are honeybees surrounding one of them. You wipe your eyes to get a clear picture of the two of them (if you have two matching corner surfaces, you bring them to the front and match them with the colored center block on the right).
You say to Art, who is standing next to you, “Are Bert are Fard? Art bee are Fard. Arred?” Which is to say, “Who are Bert and who are Fard? Art, the bees are on Fard, Arred?” By, arred, you mean to make an angry sound pirates would make it.
You repeat this until the corners sort themselves out.
CASE 1) SNAKE EYES
When you first look at Bert and Fard, you might have matching corner surface corners on the front side (snake eyes) matched with the color of the center block on the right side of the cube. In this case, saying it once should sort things out.
CASE 2) PADIDDLE
On the other hand, you may not have a matching, ‘snake eyes’, so you do your best to match one ‘eye’ (padiddle) right of the front with the center block of the right side of the cube.
Remembering Step 7
STEP 7) ORIENT YELLOW EDGES (4 blocks solved)
So, you find yourself at the final step. You could be lucky and reach this step with the cube already solved. Otherwise, you will have exactly either 3 or 4 yellow edge blocks to solve. And there are 4 cases these permutations can arrange themselves in. The two algorithms rotate three edge blocks either counterclockwise or clockwise.
Imagine back at the museum that you sort your friends out and you are in a square room on the third floor. There are either three or four open doors. Once you close them all, you can leave the museum.
Remembering Algorithm 8 – Counterclockwise
Are Ute? Are you? Are you? Are Ute? Art Ute? Arred!
Algorithm 8 – Counterclockwise (A8-CC-RU’RU RURU’ R’U’R2) solves the yellow edge blocks (maybe the final blocks) by rotating the front-most yellow edge blocks counterclockwise.
Still looking for Ute, the artist, you point to the various doors and say, “Are Ute? Are you? Are you? Art Ute? Arred!” By which, you mean, “Are you Ute? Or are you? Or are you? Or are you Ute? The artist Ute!? Arred!” You say this pointing at first to one person, then to a second, then a third, and a fourth, then growling in exasperation you shout, “Arrrred”. You’re just a little unsure of who is the artist, Ute. The counterclockwise approach goes against what you normally would think (and the way a clock would normally rotate). So, you’re just pointing in hopes to solve the puzzle.
Remembering Bonus Algorithm 5 – Clockwise
Arred you are. You art Ute art. Ute art you art.
Bonus Algorithm 5 – Clockwise (BA5-CW-R2UR UR’U’R’ U’R’UR’) solves the yellow edge blocks (the final blocks) by rotating the front-most yellow edge blocks clockwise.
Or perhaps when you come around the bend, you spot who you think is Ute and say to him, “Arred, you are. You, art Ute, the artist. Ute, the artist, you art.” By, “Arred,” you mean, “Aha!” You’re feeling confidant with this clockwise approach, so you use the word, “art,” as in “thou art… such and such.” After all clockwise is the direction you normally go, (and the direction a clock normally rotates).
When solving the last bit of the puzzle, there are four ways in which you might see these last four yellow edge blocks…
CASE 1) COUNTERCLOCKWISE
There are only be three blocks to solve, and it appears that to solve them you need to rotate them counterclockwise. You feel unsure and start pointing at people asking them if they are Ute.
CASE 2) CLOCKWISE
There are only three blocks to solve, and they can be solved with a clockwise rotation, so you point to Ute, and declare he is, in fact, Ute.
CASE 3) CROSS
You have all four yellow edge blocks to solve, but they appear that each edge block just needs to swap with the opposite edge block. You can use either algorithm. I suggest the counterclockwise rotation because it is just a bit easier. Then reevaluate and solve again.
CASE 4) ADJACENT EDGES
You have all four yellow edge blocks to solve, but they appear that each edge block just needs to swap with the adjacent edge block. You can use either algorithm. I suggest the counterclockwise rotation because it is just a bit easier. Then reevaluate and solve again.
Resources
Get your cube – Recommend Cube Product links (affiliate) click on the links for pricing. Some links may not be available from time to time, so check at www.benbalden.com/cube for updates.
Rubik’s cube – https://amzn.to/38Tjh11
Affordable and the traditional cube, but is heavier and not as smooth as the speed cubes.
Mini cube – https://amzn.to/3pwJfNQ
Awesome little cube only an inch. This cube allows you to carry it anywhere and practice anywhere. It can be tough to turn sometimes.
Speed cube – https://amzn.to/36J5AiF
Smoothe and easy. It also springs out to allow you to move the layers even if they are not completely aligned. When this improved equipment came out, solve records dropped. Having a smooth cube helps.
Magnet cube – https://amzn.to/38ZddnI
This is essentially a speedcube with magnets to ‘snap’ the cube into place between moves making smooth solving easier. This innovation also spurred an increase in new solve times.
Mixed cubes – https://amzn.to/3lJACgw
Of course, you can get a whole set of cubes and cube variations. The 2x2x2 and the triangle pyramid is also fun to play with (and easier).
Cube-solver robot – https://amzn.to/35ETYhr
This just looks cool. I would love to get it, but haven’t yet. If you end up buying it let me know how you like it.
Smartphone apps – here are a few iPhone apps I’ve tried and liked. The Android system will likely have similar apps.
- Rubik’s Cube Official App (https://apps.apple.com/us/app/rubiks-official-cube/id1504482335) – This is the official app of the Rubik’s Cube brand. There are three different things you can do with this app: (1) Augmented Reality using the camera to help you solve your cube. (2) Virtual Cube, which lets you solve a virtual cube on the screen. And (3) a timer, which gives you a scramble and then times you to solve it.
- Cube AR (https://apps.apple.com/us/app/cube-ar/id1269336347) – The app scans your cube and helps you solve it.
- Cube Solver (https://apps.apple.com/us/app/magic-cube-solver/id784085951) – You can put in your colors in a graph and it will give you solve instructions. That’s it.
- A Solver (https://apps.apple.com/us/app/asolver-lets-solve-the-puzzle/id1505663005) – This app also photographs your cube (or you can input them) and it will give you instructions to solve it.
- Watch Cube (https://apps.apple.com/us/app/watch-cube/id1469772445) – Solve a cube on your Apple Watch. It’s a mini cube you can practice with anywhere.
Screenshot of these apps. In the order mentioned.
Solving gadgets:
- Video of Lego Robotic Solve (https://youtu.be/dreTvumjNyw) – There are a lot of LEGO cube solver devices people have built. This one looks like one anyone can build with the right LEGO Mindstorm kit.
- Cube-solving robot on Amazon (https://amzn.to/35ETYhr) – This is an amazing portable robot you can buy that will scan and solve your cube for you.
Helpful solving websites:
- Cube Solver: https://rubiks-cube-solver.com/
- Cube Scrambler: https://www.jaapsch.net/scramble_cube.htm
Video Resources
- Solve the Cube Wired(2 x alg): https://youtu.be/R-R0KrXvWbc
- WIRED Article: https://www.wired.com/story/how-to-solve-a-rubiks-cube-step-by-step/
- Impossible: https://www.youtube.com/watch?v=SUopbexPk3A
- Solve easy: https://www.youtube.com/watch?v=1t1OL2zN0LQ
- Easiest to learn(intuitive): https://www.youtube.com/watch?v=9spDGBeWl1o
- Lego solve: https://youtu.be/dreTvumjNyw
- Fastest solve: https://www.youtube.com/watch?v=F4keoLytAsM
- 10 fun facts (largest and smallest Rubik’s Cube at 9:37) https://www.youtube.com/watch?v=f-rjR0lUDmg
- How the Inventor of the Rubik’s Cube Cracked His Own Creation https://youtu.be/l_-QxnzK4gM
Website Resources
- History of cube: https://www.rubiks.com/en-us/about
- Information about the cube: https://en.wikipedia.org/wiki/Rubik%27s_Cube
- Cube world records data: https://www.worldcubeassociation.org/results/records
- Speed cube records: https://www.recordholders.org/en/list/rubik.html
- Economist Article: https://www.economist.com/graphic-detail/2019/07/11/speedcubers-are-solving-rubiks-cubes-at-ever-faster-speeds
- Rubik’s Cube Record data chart: https://engaging-data.com/rubiks-cube-world-records/
- Cube Solver: https://rubiks-cube-solver.com/
- Cube Scrambler: https://www.jaapsch.net/scramble_cube.htm
Short List of Cube Recommendations:
- Rubik’s cube – https://amzn.to/38Tjh11
- Mini cube – https://amzn.to/3pwJfNQ
- Speed cube – https://amzn.to/36J5AiF
- Magnet cube – https://amzn.to/38ZddnI
- Mixed cubes – https://amzn.to/3lJACgw
- Cube solver robot – https://amzn.to/35ETYhr
Charts and Guides
Here are some charts and guides to help you with your Rubik’s Cube.
Rubik’s Cube Language
| Side | Right | Left | Down | Up / Top | Front | Back |
| Clockwise | R | L | D | U | F | B |
| Counterclockwise | R’ | L’ | D’ | U’ | F’ | B’ |
| Double | R2 | L2 | D2 | U2 | F2 | B2 |
| Two Levels | r | l | d | u | f | b |
| Two Levels CCW | r’ | l’ | d’ | u’ | f’ | b’ |
Other cube notations:
| Section rotated | Whole cube
x – axis |
Whole cube
y – axis |
Whole cube
z – axis |
Middle layer L&R | Middle layer F&B | Middle layer U&D |
| Clockwise | x | y | z | M | S | E |
| Counterclockwise | x’ | y’ | z’ | M’ | S’ | E’ |
My insanely weird language to help you learn to solve the cube…
| Side | Clockwise (N) | Counterclockwise (N‘) | Double (N2) |
| U-upper | You | Ute | You’d |
| R-right | Are | Art | Arred |
| F-front | Eff | Fart | Fard |
| B-back | Be | Bert | Bard |
| L-left | Elle | ‘Elt | Lard |
| D-down | Dee | Dirt | Dard |
All The Algorithms
- 8 Algorithms
- You only need to remember 8 necessary algorithms to solve the entire cube.
- However, there are 5 bonus algorithms you can immediately add to your repertoire once you master the necessary algorithms.
- NECESSARY ALGORITHMS – Memorize these first
- Algorithm 1: RUR’U’ – Repeat for All White Corners to Drop (AD)
- Algorithm 2: URU’R’U’F’UF – Drop Colored Edge on Front (EF)
- Algorithm 3: R’U’R’U’R’URUR – Drop Colored Edge on Right (ER)
- Algorithm 4: FRU R’U’F’ – Repeat to make the Yellow [X]Cross (YX)
- Algorithm 5: R’U2RUR’UR – Yellow Surface Beginning with Right (YR)
- Algorithm 6: U’RU’2R’ U’RU’R’ – Yellow Surface Beginning with Up (YU)
- Algorithm 7: RB’RF2 R’BRF2 R2 -Solve Yellow Corners (YC)
- Algorithm 8: RU’RU RURU’ R’U’R2 – Rotate Yellow Edges Counterclockwise 🔄 (CC)
- BONUS ALGORITHMS
- Bonus Algorithm 1: URU’R’ – Drop Corner with White on Front Down (FD)
- Bonus Algorithm 2: RUR’ – Drop Corner with White on Right Down (RD)
- Bonus Algorithm 3: RU2R’U’RUR’ – Drop Corner with White on Top Down (TD)
- Bonus Algorithm 4: RU2R’U RU2R’U F’U’F – Flip Colored Edge (FE)
- Bonus Algorithm 5: R2UR UR’U’R’ U’R’UR’ – Rotate Yellow Edges Clockwise 🔁 (CW)
Mnemonic Devices Shortcuts
———–BOTTOM LAYER———–
Step 1 – Make the Daisy – Enter the Museum with daisy key
Move white edges top surrounding the yellow center, and match each white edge with colored center blocks, then flip down.
Step 2 – White corner blocks – Find friends at the museum
- Alg 1–All Drop–RUR’U’–“Are you…? Art Ute?” (“Excuse me, are you here for the Art Ute exhibit?”)
- B. Alg 1–Front Drop–URU’R’–“You are Ute Art.” (“You are here for the Ute art exhibit, yeah?”)
- B. Alg 2–Right Drop–RUR’–“Are you… art?” (“Are you here for the… art?”)
- B. Alg 3–Top Drop–RU2R’U’RUR’–“Are you’d art Ute? Are you art?” (“Are you the artist Ute? Are you the one who did this art?”)
———–MIDDLE LAYER———–
Step 3-Solve color edge blocks in middle layer – Move paintings
- Alg 2-Edge Front-URU’R’U’F’UF-“You are Ute art, Ute! [Fart.] You Eff?” (“Are you the artist that created all this Ute art, Ute?” [fart] “Eff, was it you that farted?”)
- Alg 3-Edge Right-R’U’R’U’R’URUR-“Art Ute… Art Ute art? You are! You are!” (“Hey, Artist Ute, are you the artist who painted this Ute art?” Confirming it was him.)
- B. Alg 4-Flip Edge-RU2R’U RU2R’U F’U’F-“Are you’d art, you? Are you’d art, you? Fart Ute, Eff.” (“Are you da artist, you there? Are you the artist, you there? Fart on Ute, Eff.”)
———–TOP LAYER———–
Step 4-Solve Yellow Cross-Put Ute in crosshairs of your gun
- Alg 4-Yellow Cross-FRU R’U’F’-“Eff, are you art Ute, fart?” (“Hey, Eff, are you seeing the artist Ute? If so, then fart, so I know.”)
Step 5-Yellow Top Surface-Clear floor to step onto
- Alg 5-Yellow Right-R’U2RUR’UR-“Art, you’d… Are you Art? You are!” (“Hey, Artist, you’d better…. Are you an artist? Haha, You are!”)
- Alg 6-Yellow Up-U’RU’2R’ U’RU’R’-“Ute are Ute’d art. Ute are Ute art.” (“Ute, you are Ute’d” – like you’re telling him it’s clear by the feathers in his cap, that he’s really a Ute Indian. “Ute, you are the Ute artist!”)
Step 6-Fix Yellow Corners-Get bees off your friends
- Alg 7-Yellow Corners-RB’RF2 R’BRF2 R2-“Are Bert are Fard? Art bee are Fard. Arred?” (“Who are Bert and who are Fard? Art, the bees are on Fard, Arred?” By, arred, you mean to make an angry sound as pirates would make it.)
Step 7-Orient Yellow Edges-Close the doors to leave the museum
- Alg 8-Counterclockwise-RU’RU RURU’ R’U’R2-“Are Ute? Are you? Are you? Are Ute? Art Ute? Arred!” (“Are you Ute? Or are you? Or are you? Or are you Ute? The artist Ute!? Arred!”)
- B. Alg 5-Clockwise-R2UR UR’U’R’ U’R’UR’-“Arred you are. You art Ute art. Ute art you art.” (“Arred, you are. You, art Ute, the artist. Ute, the artist, you art.”)
Footnotes and References
- For a full account, see the Wikipedia article Rubik’s Cube at https://en.wikipedia.org/wiki/Rubik%27s_Cube
- You can read the entire history of how the Rubik’s Cube became the world’s most popular toy at https://www.rubiks.com/en-us/about
- The World’s Biggest Rubik’s Cube https://www.guinnessworldrecords.com/news/2020/4/british-puzzle-maker-creates-worlds-largest-rubiks-cube-614455
- The World’s Smallest Rubik’s Cubehttp://tonyfisherpuzzles.net/191ItsybitstyteenyweenyRubiksCube.html
- Guinness World Records Smallest: https://www.guinnessworldrecords.com/world-records/smallest-rubiks-cube-[/note]. There is also the world’s most expensive Rubik’s Cube, The Masterpiece Cube, valued around $2.5 Million (2016 value).5 Most Expensive Cube, Fandom WikiCube https://rubiks.fandom.com/wiki/Most_Expensive_Cube. You can buy it here: https://www.hushhush.com/kids/toys-games/the-masterpiece-cube-rubiks-cube
- See the Rubik’s Cube history timeline on Rubik’s Cube’s website https://en.wikipedia.org/wiki/Rubik%27s_Cube
- David Singmaster’s book called, Notes on Rubik’s “Magic Cube” (1980) began a notation still used today to solve the cube. Here is the updated book The Cube: The Ultimate Guide: https://amzn.to/33kE9L4
- You can see the world records at https://www.rubiks.com/en-us/speed-cubing and https://en.wikipedia.org/wiki/Rubik%27s_Cube
- Emily Gittemeier, daughter of Kevin Gittemeier solves the Rubik’s Cube https://youtu.be/DUdq2vqybpU
- The factorial of an integer (!) is the product of all integers below it down to one. For example, factorial 4 = 4! = 4 x 3 x 2 x 1 = 24.
- No. I didn’t figure this out all on my own. I had help. https://en.wikipedia.org/wiki/Rubik%27s_Cube
- A robot developed by MIT students Ben Katz and Jared Di Carlo can solve a Rubik’s Cube in a record-breaking 0.38 seconds. https://news.mit.edu/2018/featured-video-solving-rubiks-cube-record-time-0316
- You can read more about his in the Wikipedia article https://en.wikipedia.org/wiki/Rubik%27s_Cube
- See here http://anttila.ca/michael/devilsalgorithm/
- I created a simple set up with the following parameters: Cube size: 3; Number of scrambles: 5; Scramble length: 10; Colours (DLBURF): yobwrg; link here
View Contents


Anyone can comment